Unit 2 - Pivoting, Identity Verifiers & Network SQL Agent
Introduction
This unit introduces the ability of running Core Impact modules from a previously compromised host, which may provide access to assessing a network that is not reachable directly from the Impact console.
The ability to run Core Impact modules from another host is known as pivoting, and it can be leveraged in other scenarios as well. For example, to perform a a remote security assessment where the user is provided access to a host on the target network. Instead of installing Core Impact on the host, an OS Agent can be deployed on the target (for example, using ssh if it's on another platform too) which can then be used to run the Core Impact modules in the session.
Then a database system on an internal back-end network is compromised, which shows the ability of Core Impact to interact with database systems and potentially escalate such access to running an OS Agent on the database host.
Features
- Leverage a previously compromised host to run Core Impact modules from that system
- Explore a compromised database system with a Network SQL Agent
- Escalate from database access to running an OS Agent on the database host
- Generate report of discovered vulnerabilities
Highlighted Modules
- Network Information Gathering RPT
- Network Attack and Penetration RPT
- Network Clean Up RPT
- Network Report Generation RPT
- Install PCAP Plugin
- Refresh Network Interfaces
- PostgreSQL Identity Verifier
- SQL Shell
- Install SQL Agent using credentials
- Install OS Agent using SQL Agent
References
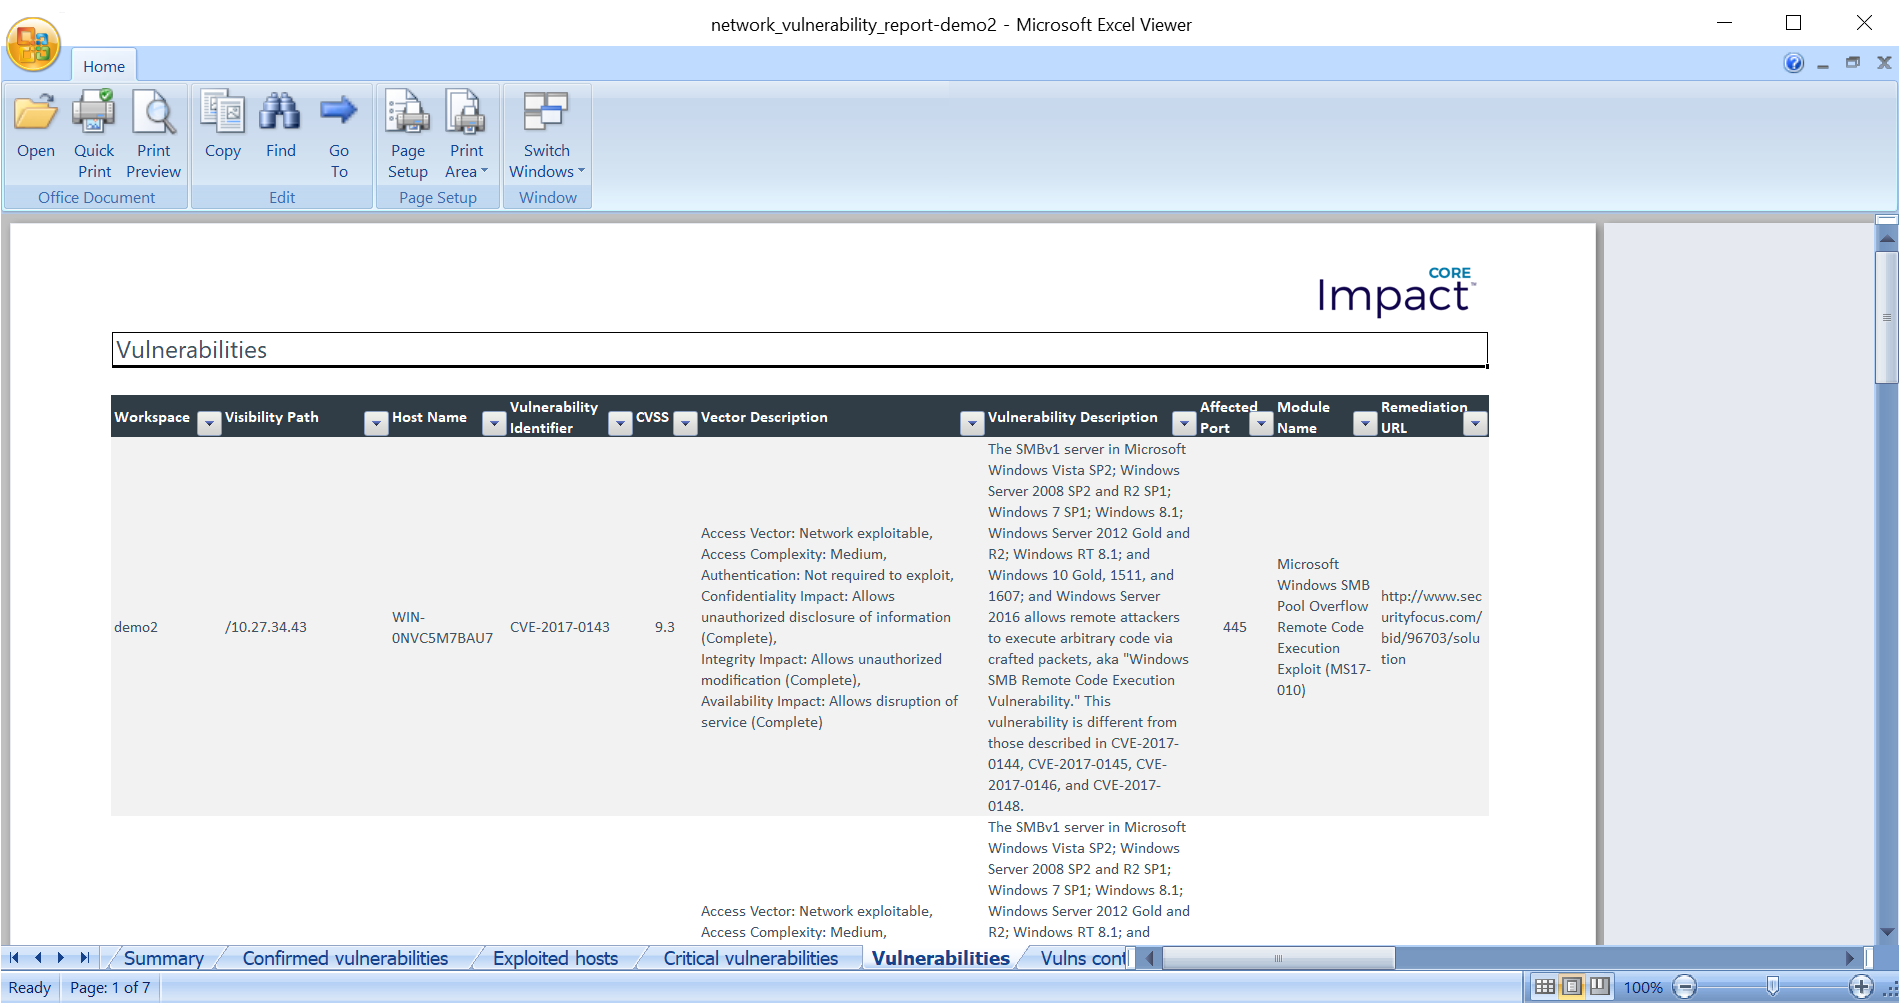
- Microsoft Windows SMB Pool Overflow Remote Code Execution Exploit (MS17-010)
- Vulnerabilities: CVE-2017-0143, CVE-2017-0144, CVE-2017-0145, CVE-2017-0146, CVE-2017-0147, CVE-2017-0148
- Wikipedia article on EternalBlue
- What Is EternalBlue and Why Is the MS17-010 Exploit Still Relevant?
- Weak Credentials
Walkthrough
Hosts
- Microsoft Windows SMB Pool Overflow Remote Code Execution Exploit (MS17-010)
- Hostname:
WIN-0NVC5M7BAU7 - IP Address:
10.27.34.43
- Hostname:
Create a New Workspace
Follow the steps from the previous unit and create a new workspace (demo2).
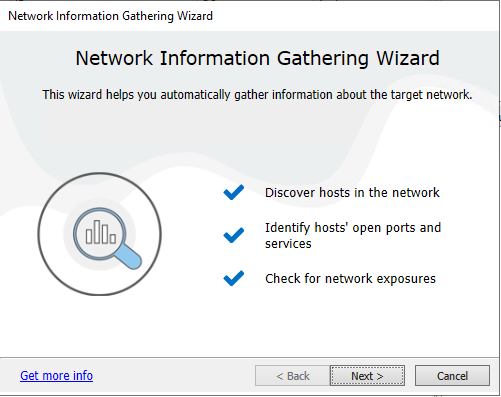
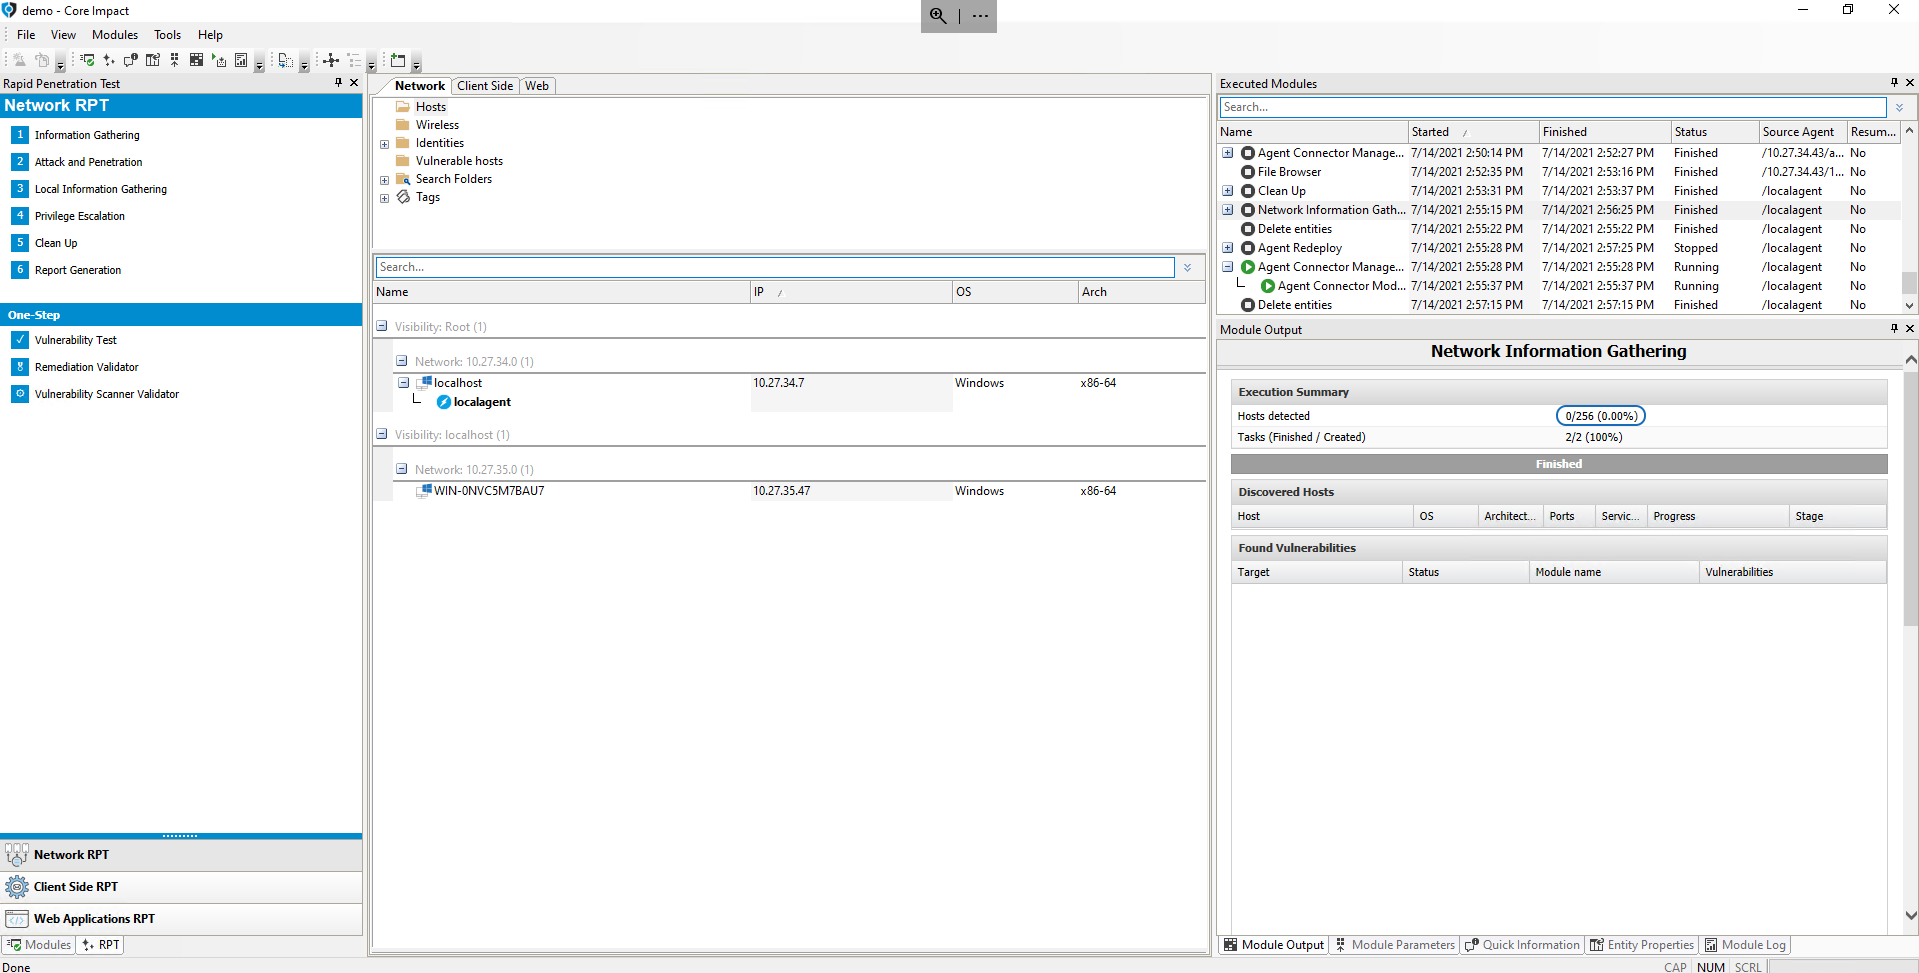
Network Information Gathering
We'll now launch the Network Information Gathering RPT module to discover a target host and determine running services to test.
- From the RPT Pane, select and click Network Information Gathering RPT to discover hosts on the network.
- Click Next.

- Click Next.
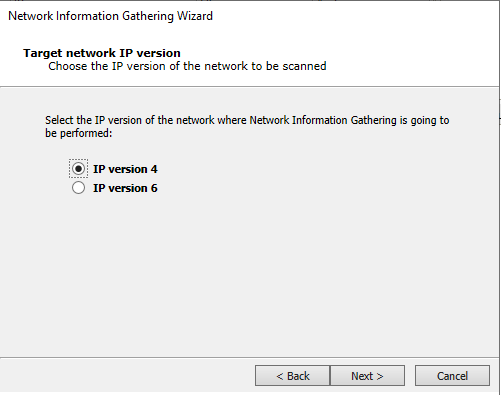
- Click Next.
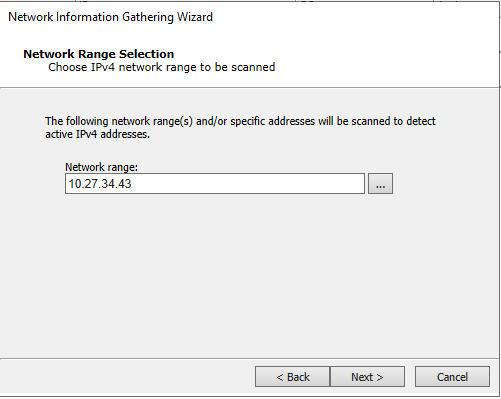
- Replace the network range with the address of the target host:
10.27.34.43and click Next.
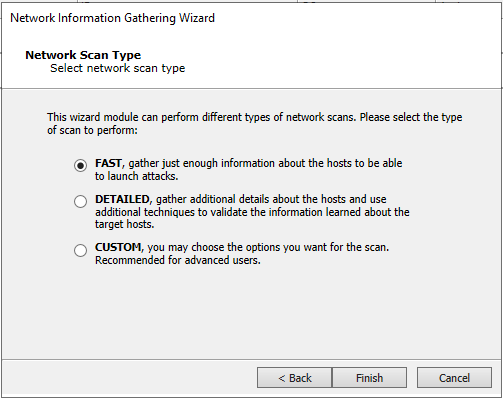
- Select FAST and click Finish.
The Network Information Gathering module will launch, which will discover and perform information gathering on the WIN-0NVC5M7BAU7 (10.27.34.43) host.
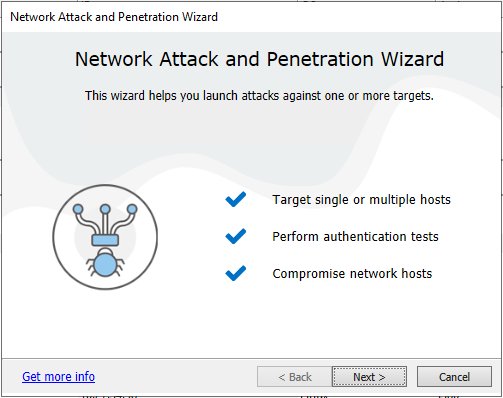
Network Attack and Penetration With Remote Exploits
We'll now launch Network Attack and Penetration RPT to use Core Impact exploits to try to detect and exploit vulnerabilities to compromise and control the target host.
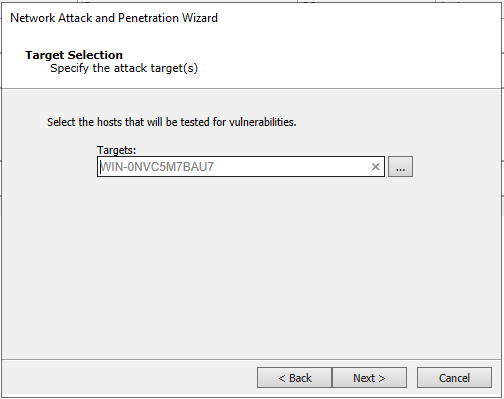
- From the RPT Pane, select and drag & drop the Network Attack and Penetration RPT module onto the
WIN-0NVC5M7BAU7(10.27.34.43) host, created in the previous section.
- Click Next.
- Click Next.
The WIN-0NVC5M7BAU7 (10.27.34.43) host will already be selected because the module was drag & dropped on the target. If you launch Network Attack and Penetration by just clicking the module, in this step you can use ellipsis (...) button to select the module's targets.

- Click Next.
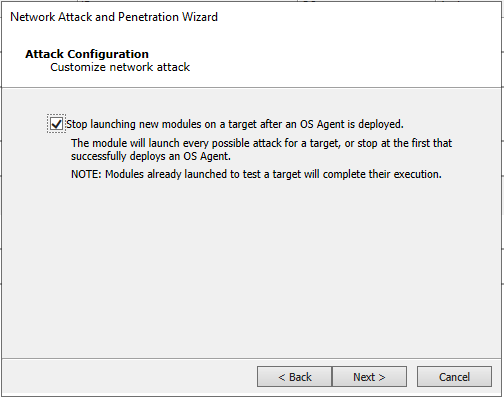
- Click Next.
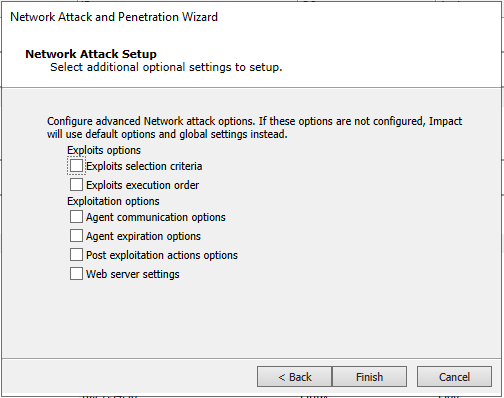
- Click Finish.
The Network Attack and Penetration module will launch, and after testing available exploits for the identified OS and services, it should be able to detect and exploit the EternalBlue vulnerability and deploy an OS Agent.

Installing the PCAP Plugin
On the deployed OS Agent, we'll setup the PCAP plugin, which provides the agent with additional cabilities to capture and inject network traffic on the compromised host, which allows for more reliable network information gathering methods to be executed.
- From the list view, right-click on the deployed OS agent and select Install pcap plugin to survey available network interfaces and perform more reliable IG.
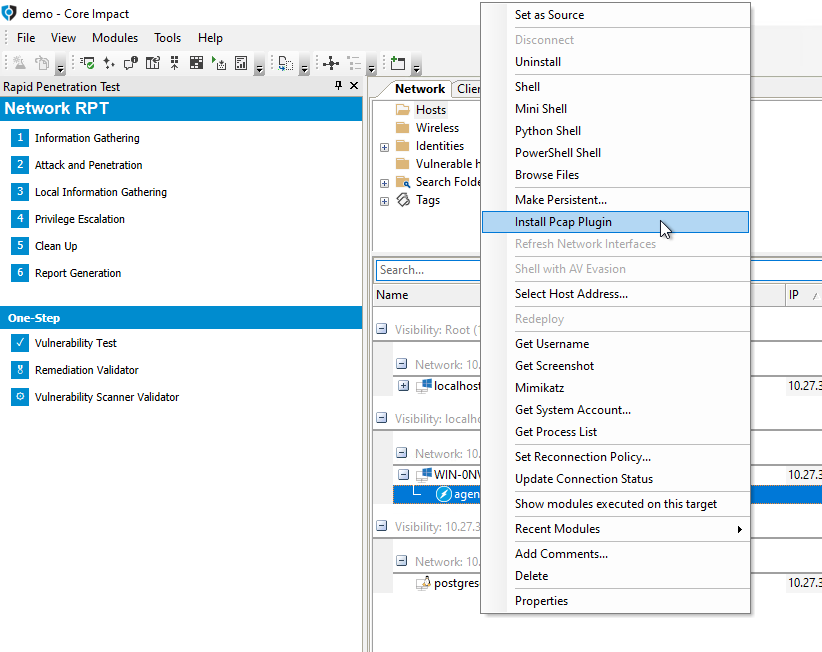
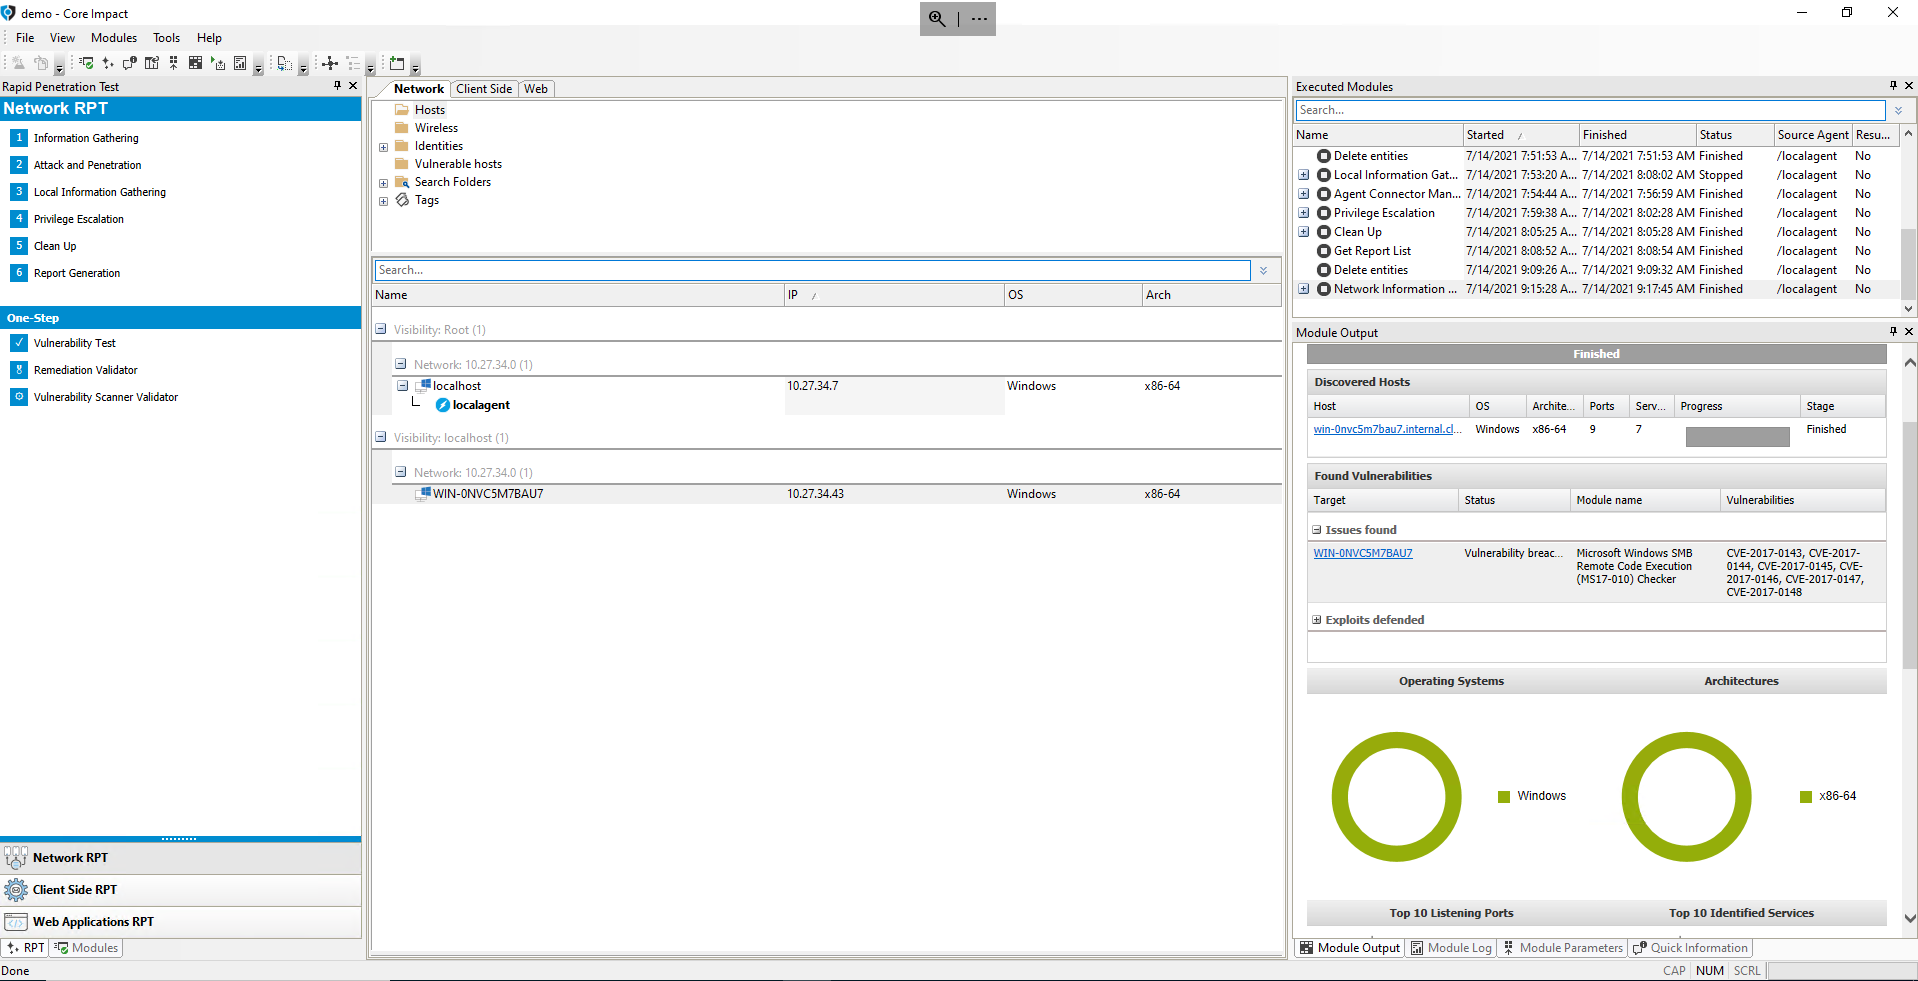
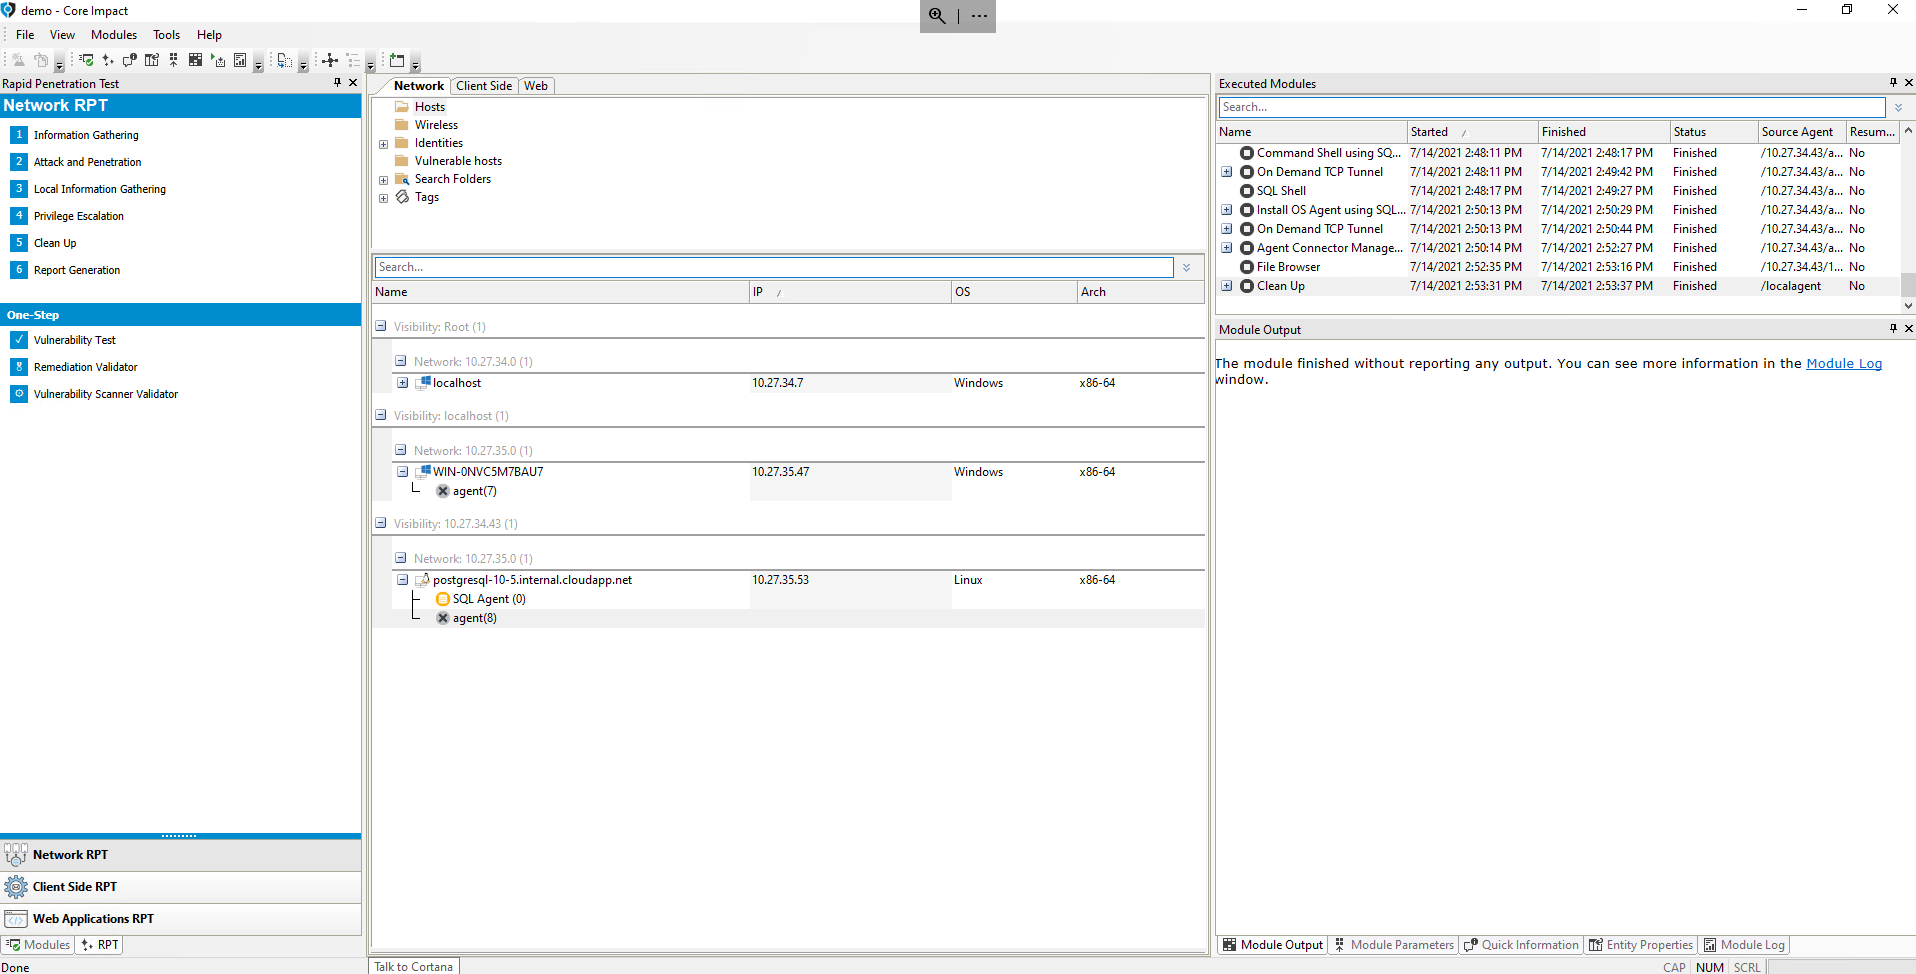
- In the Executed Modules pane, open the PCAP Plugin Install module and select the Refresh Network Interfaces module.
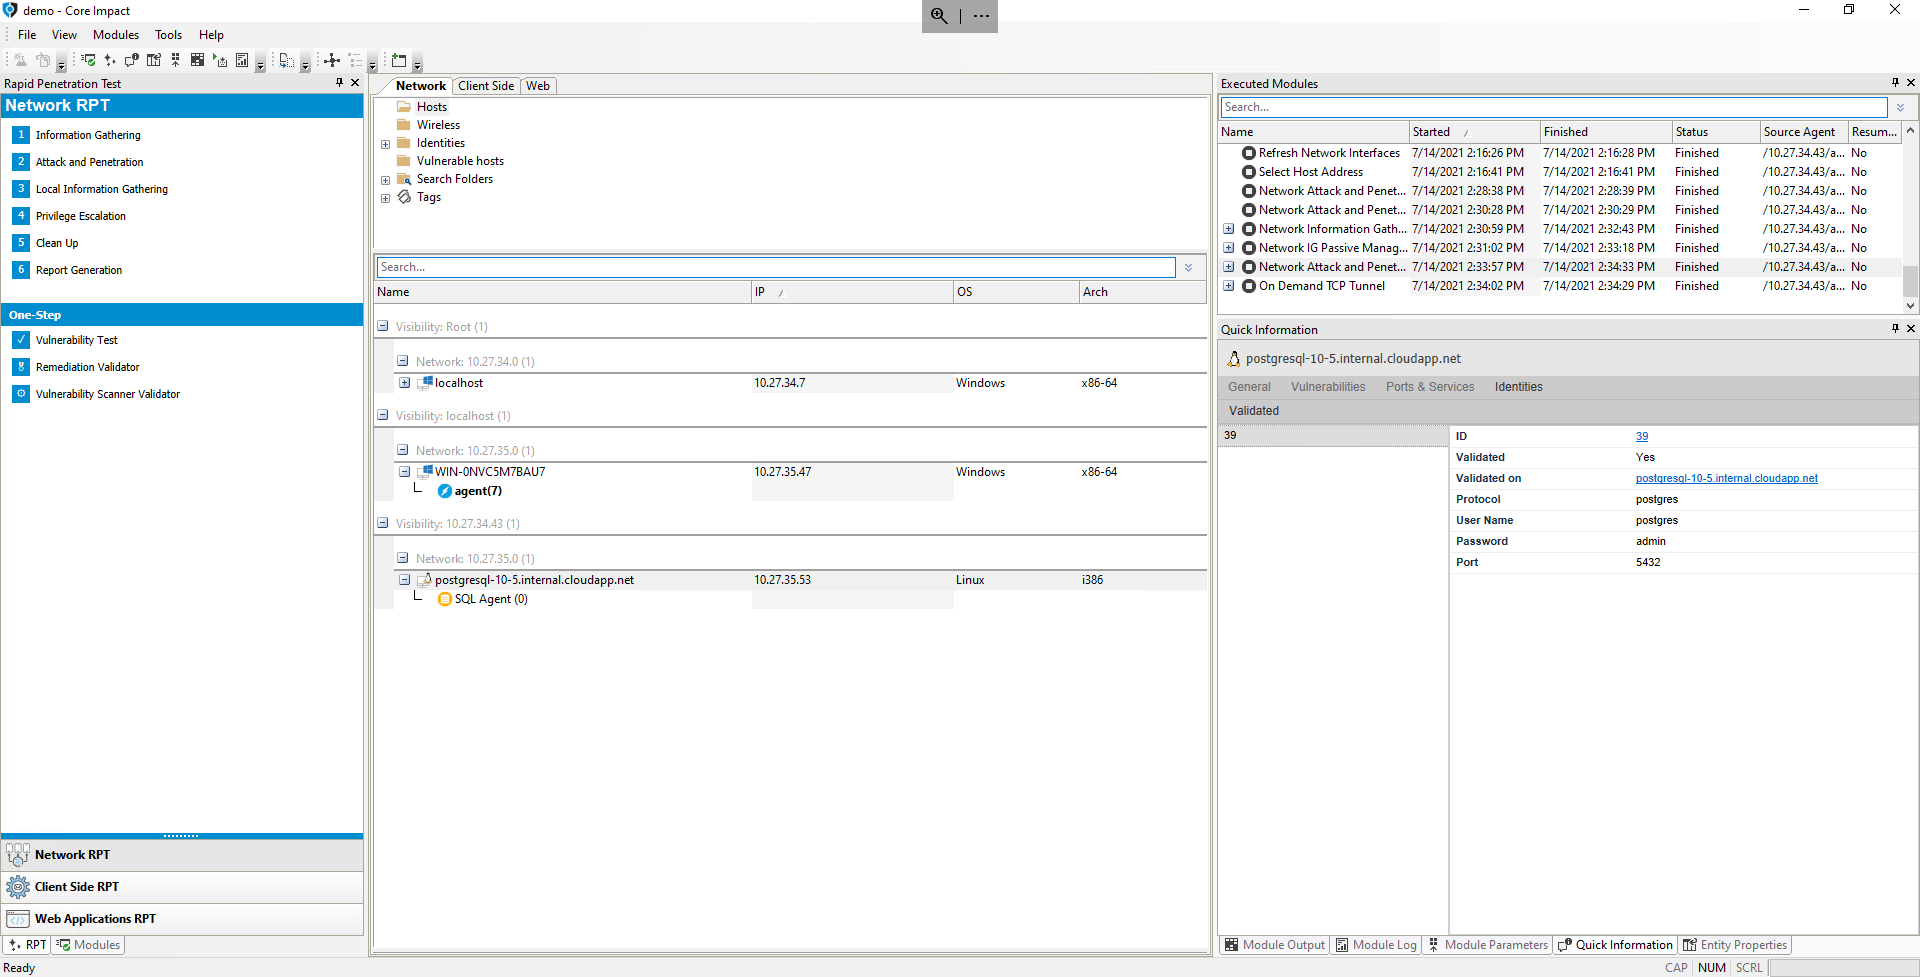
The Module Output of the Refresh Network Interfaces shows that the host has two interfaces, on two separate networks:
10.27.34.0/24(Netmask:255.255.255.0)- This is the network where the Impact Client VM is also located and through which we discovered and compromised the host.
10.27.35.0/24(Netmask:255.255.255.0)- This is an internal network, which is not reachable from the Impact Client VM.
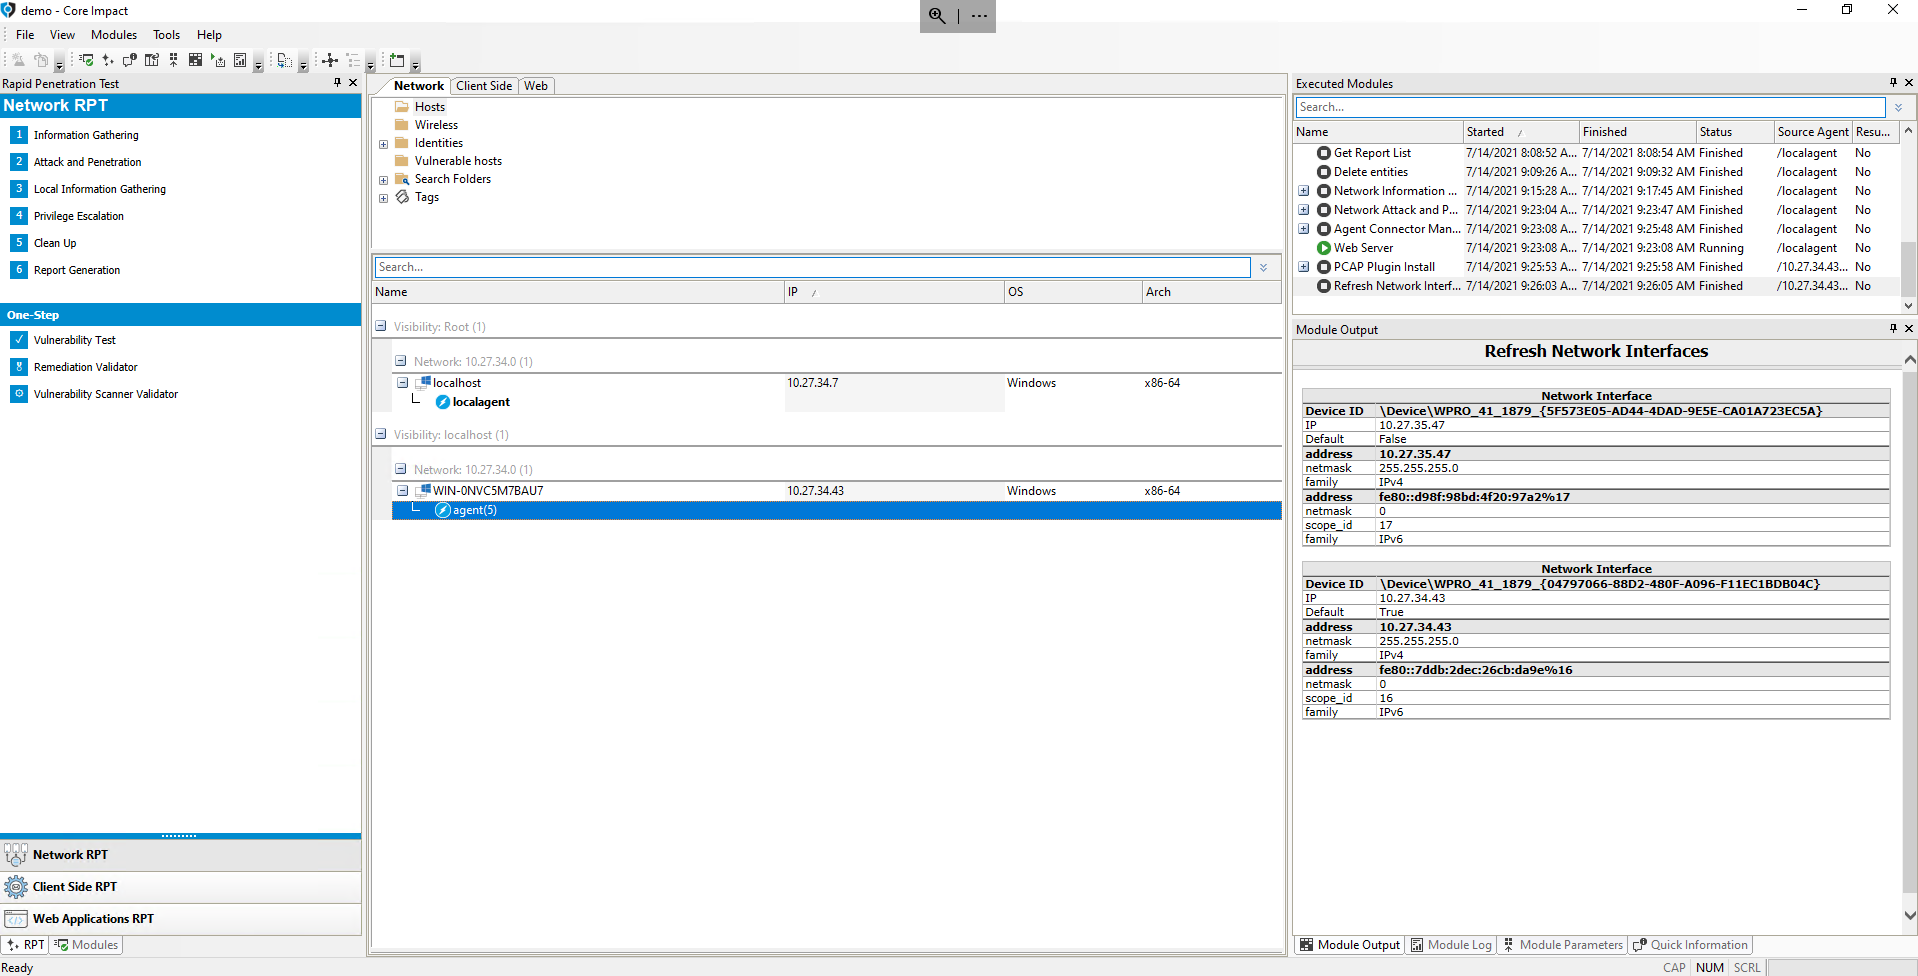
The available network interfaces on the host are stored in the OS Agent's properties, and are shown in the Quick Information pane when selecting it.
Perform Network Information Gathering on Unreachable Network
We'll now confirm that the second network we've just discovered is not reachable from the Impact Client VM.
Execute the steps to launch Network Information Gathering from the previous unit, but replacing the network range with 10.27.35.50/29.
After the Network Information Gathering RPT module is launched and completes its execution, the module will not have been able to find (and add) new hosts.
Perform Network Information Gathering From Compromised Host
Leveraging the OS Agent on the compromised WIN-0NVC5M7BAU7 (10.27.34.43) host, we'll perform Network Information Gathering on the internal network.
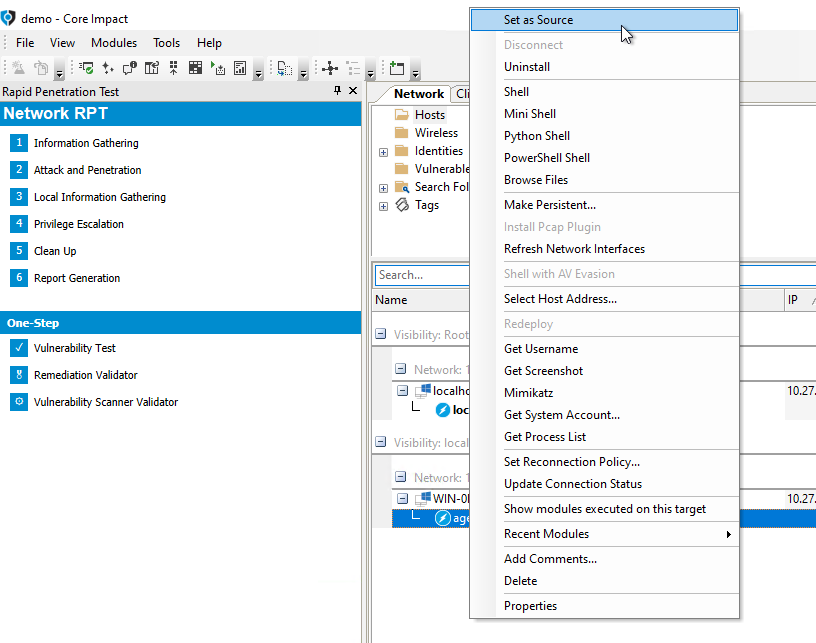
In order to execute Core Impact modules from the compromised host, we'll set the agent(0) as the source agent.
- Right-click on the
agent(0)entity and select Set as source.
- From the RPT Pane, select and click Network Information Gathering RPT to discover hosts on the internal network.
- Click Next.
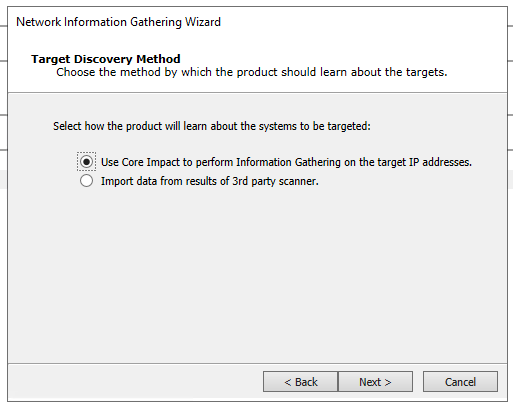
- Click Next.
- Click Next.
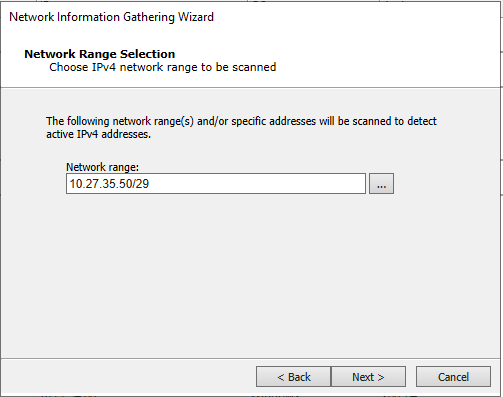
- Replace the network range with the address of the internal network:
10.27.35.50/29and click Next.
- Click the ellipsis (
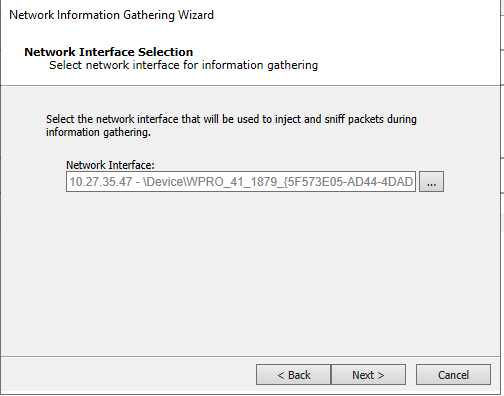
...) button and selec the network interface with the IP address (10.27.35.47) on the internal network, and click OK. - Click Next.
- Select FAST and click Finish.
The Network Information Gathering module will launch, which will discover host 10.27.35.53. If the host is selected, it can be seen that the host is running a PostgreSQL database's service.
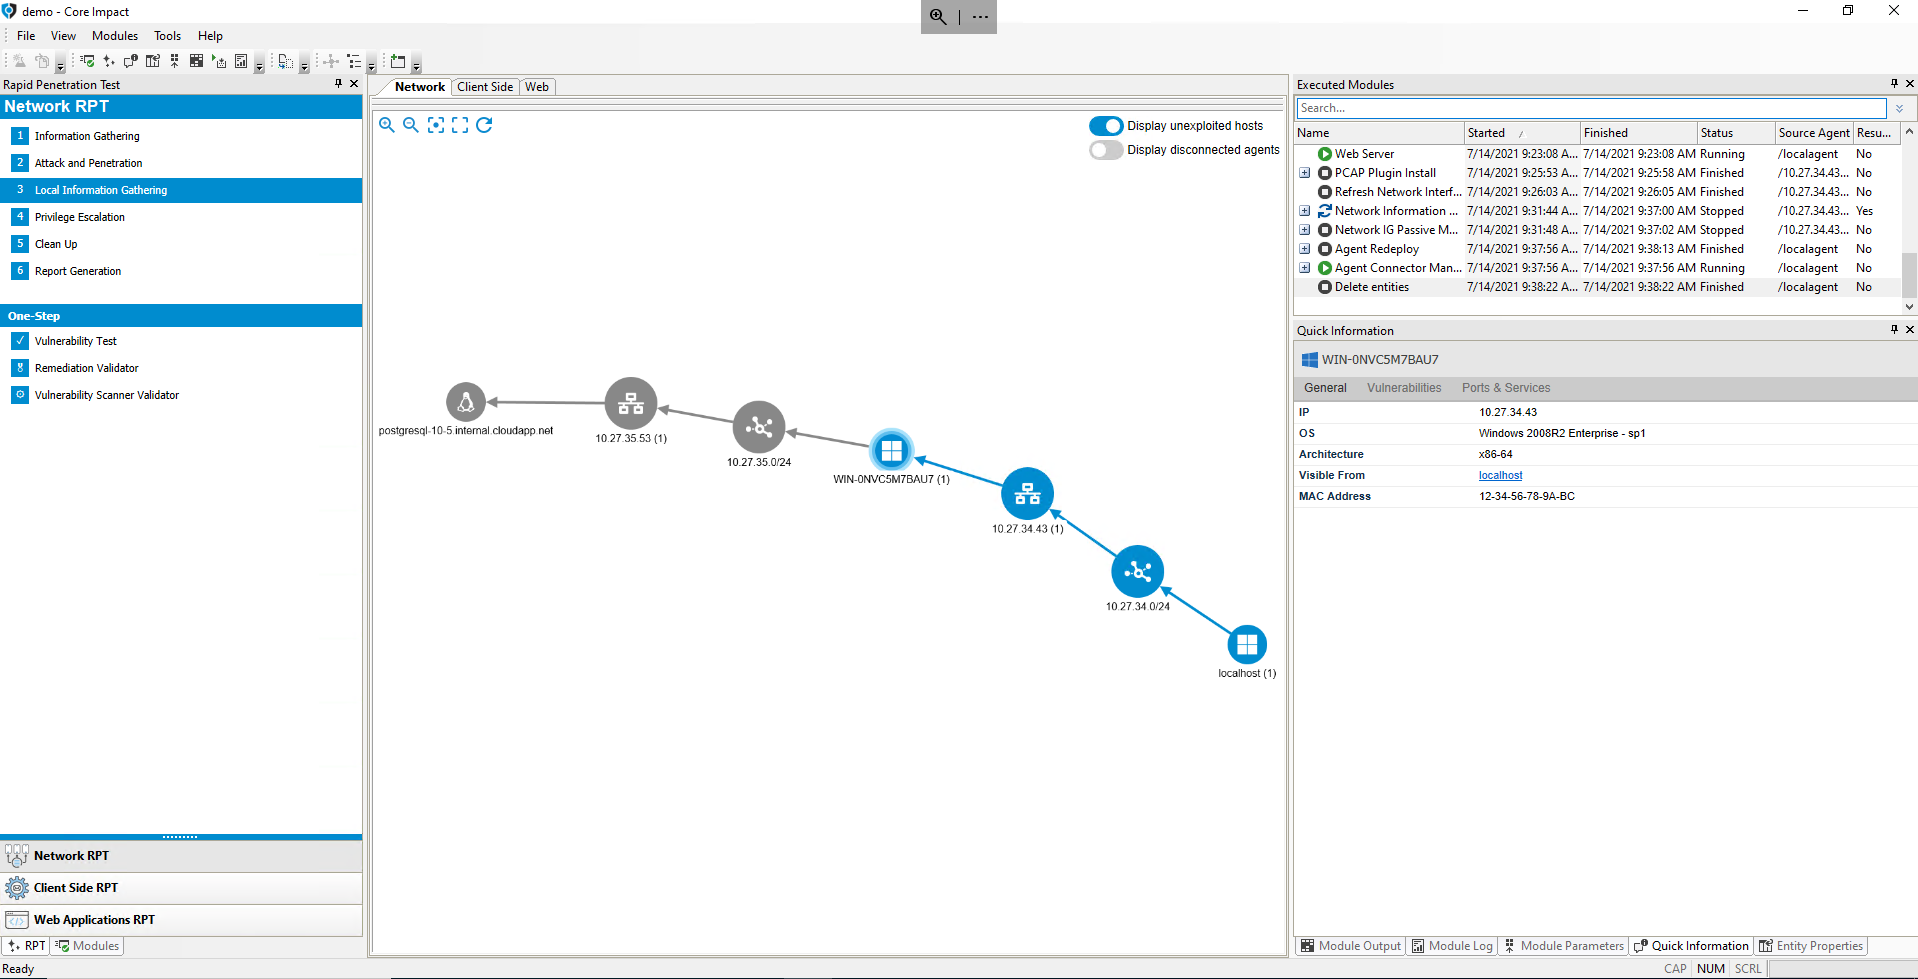
Notice that the Executed Modules pane shows in the Source column that the modules have run on the agent previously set as source.
Run Dictionary Attack on PostgreSQL Service to Find Weak Credentials
We'll try to compromise the PostgreSQL service by checking if weak credentials have been configured, and which can be determined by running a dictionary attack using Core Impact's Identity Verifiers.
In this scenario the administrator of the machine may have assumed that stronger credentials would not be necessary as there is no direct access from the local network into the server.
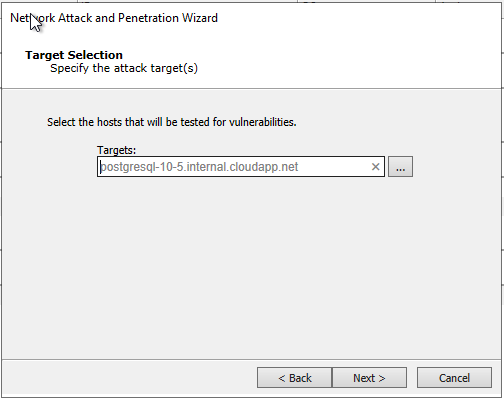
- From the RPT Pane, select and drag & drop the Network Attack and Penetration RPT module onto the
postgresql-10-5.internal.cloudapp.net(10.27.35.53) host, created in the previous section.
- Click Next.
- Click Next.

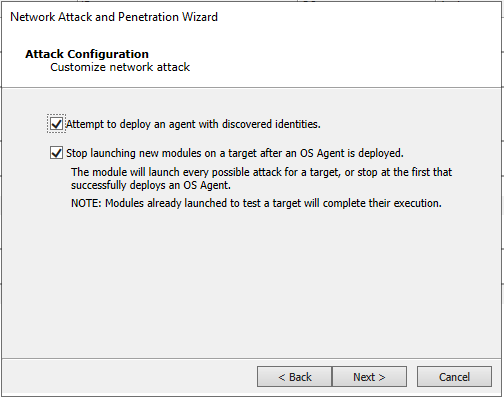
- Uncheck option to launch exploits and check the option to launch identity verifiers, and click Next.
- Click Next.
- Check the Identity verifier protocol selection option to limit the protocols on which we'll try identity verifiers, and click Next.
- Click Uncheck All and then check the PostgreSQL option.
- Click Finish.
Network Attack and Penetration will start and after a while it'll find a weak credential, which will be used to configure a Network SQL Agent on the target host.
Notice that a Network SQL Agent is different from an OS Agent. This agent allows the user to execute SQL commands impersonating the user associated with the valid credentials found by the Identity Verifier module.
Interact With the Database Server Through the Network SQL Agent
We're now going to execute SQL queries on the compromised PostgreSQL database server, in order to obtain information about the databases on the server, and look for sensitive information.
- Right-click on the SQL Agent (0) entity and select SQL Shell.
- Execute the following command to list available databases:
select datname from pg_catalog.pg_database
- Close the shell by executing the
exitcommand.
Because PostgreSQL doesn't provide commands to switch to another database (like the USE DATABASE command in SQL Server), we'll set up a new Network SQL Agent to connect to the northwind database.
We'll need the credentials used to deploy the previous Network SQL Agent, which can be seen in the vulnerability configured in the host, select the available identity and see that the username is postgres and the password is admin.
- In the Modules pane, open the 10-Post Exploitation > Agents folder and select the module Install SQL Agent using credentials.
- Drag & drop the module onto the
postgresql-10-5.internal.cloudapp.net(10.27.35.53) host. - Configure the module parameters:
- Database engine:
PostgreSQL - User:
postgres - Password:
admin - Database:
northwind
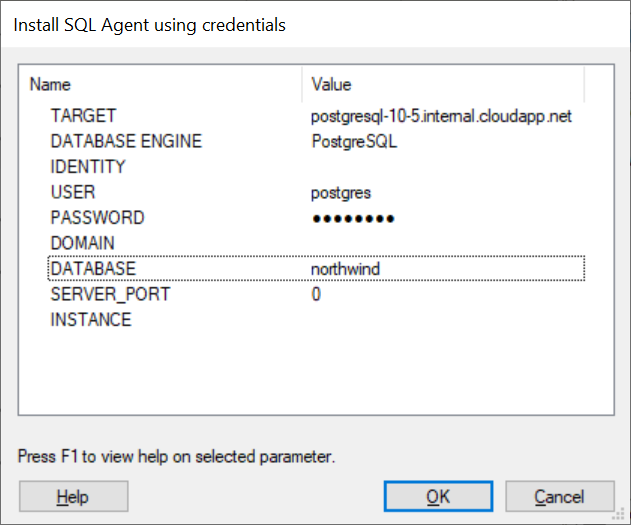
- Click OK.
Another Network SQL Agent should now be configured, which will execute SQL statements on the specified database (northwind).
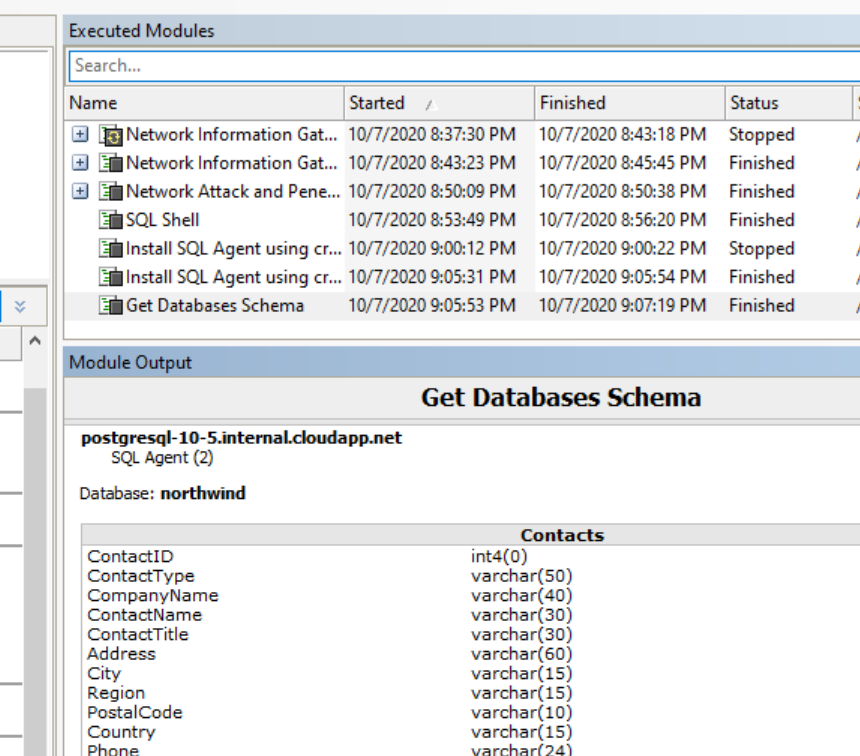
We'll now get information about the database by running the Get databases schema module.
- In the Modules pane, search for the module by entering its name, and then drag & drop it in the new Network SQL Agent.
You can see the module's log while it makes progress in retrieving the database schema executing SQL statements. When the module finishes, the database's tables are shown in the Module Output pane.
We can now leverage the database schema information and retrieve the people in the Contacts table.
- Right-click on the SQL Agent (1) entity and select SQL Shell.
- Execute the command:
select "ContactName" from "Contacts".
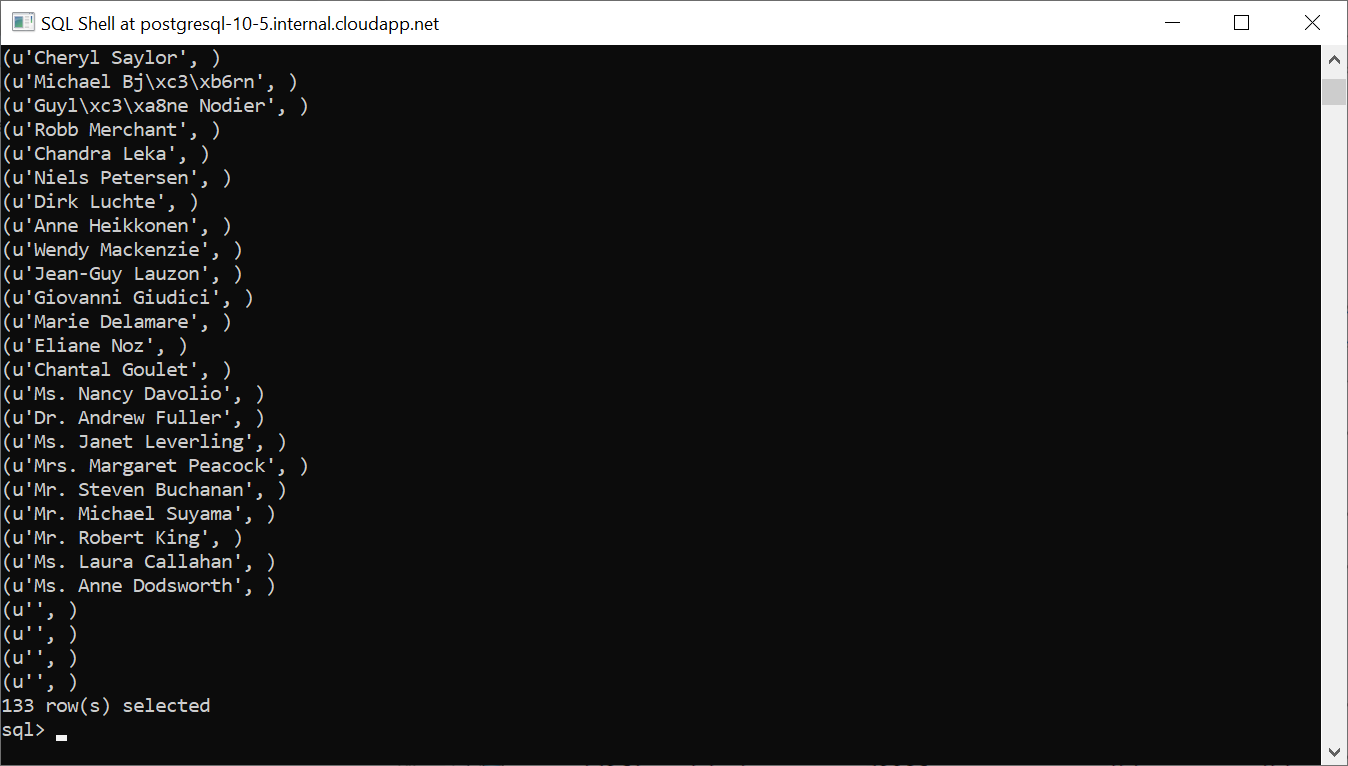
- Close the shell.
Escalate the Network SQL Agent and Deploy an OS Agent
If the database and credentials used to deploy the Network SQL Agent allow it, we can try and escalate from that agent (which allows us to execute only SQL statements) and try to deploy and OS Agent to have shell like features on the host.
Before we do that, we need to go to the pivot OS Agent we're using in 10.27.34.43 and change the host address that Core Impact is configured to use from that host, and choose one of the other IP address available in the host.
This is required to deploy the OS Agent on the PostgreSQL host, because the module will create a process that will try to connect back to the pivot agent, and the IP address that it connects back to is configured by the current IP address on that entity. Because traffic from/to the different networks is restricted, the PostgreSQL host will not be able to connect back to 10.27.34.43, but it will be able to connect to its IP address in the 10.27.35.0/24 network, 10.27.35.47.
- Go to host
10.27.34.43, select the OS Agent configured in the host, right-click and choose the option Select host address.... - In the parameters dialog, select the ellipsis (
...) button after selecting to edit theADDRESSparameter value. - Select the
10.27.35.47IP address.
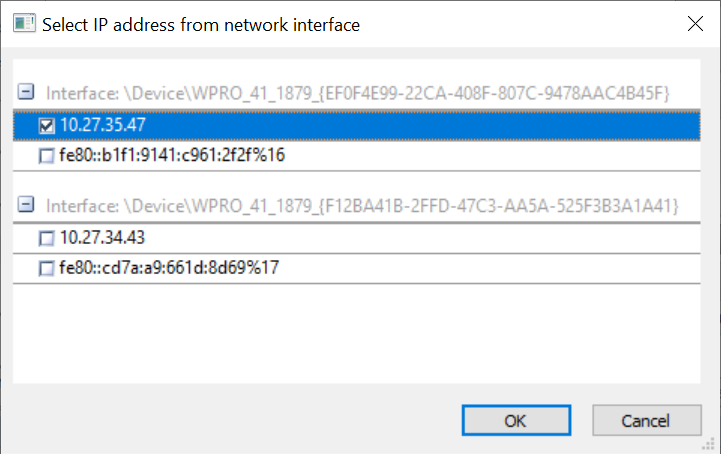
- Click OK to select the address.
- Click OK to launch the module to change the host's address.
- The IP address of the host in the network view should have been updated to reflect the selected IP address.
We're now going to try and deploy the OS Agent through the Network SQL Agent.
- Go to the Modules pane, and in the 10-Post Exploitation > Agents folder select the module Install OS Agent using SQL Agent.
- Drag-and-drop that module on the first Network SQL Agent (
SQL Agent(0)) configured in the PostgreSQL host, which has admin access and will allow for the OS Agent to be deployed.
An OS Agent should be deployed in the PostgreSQL host.
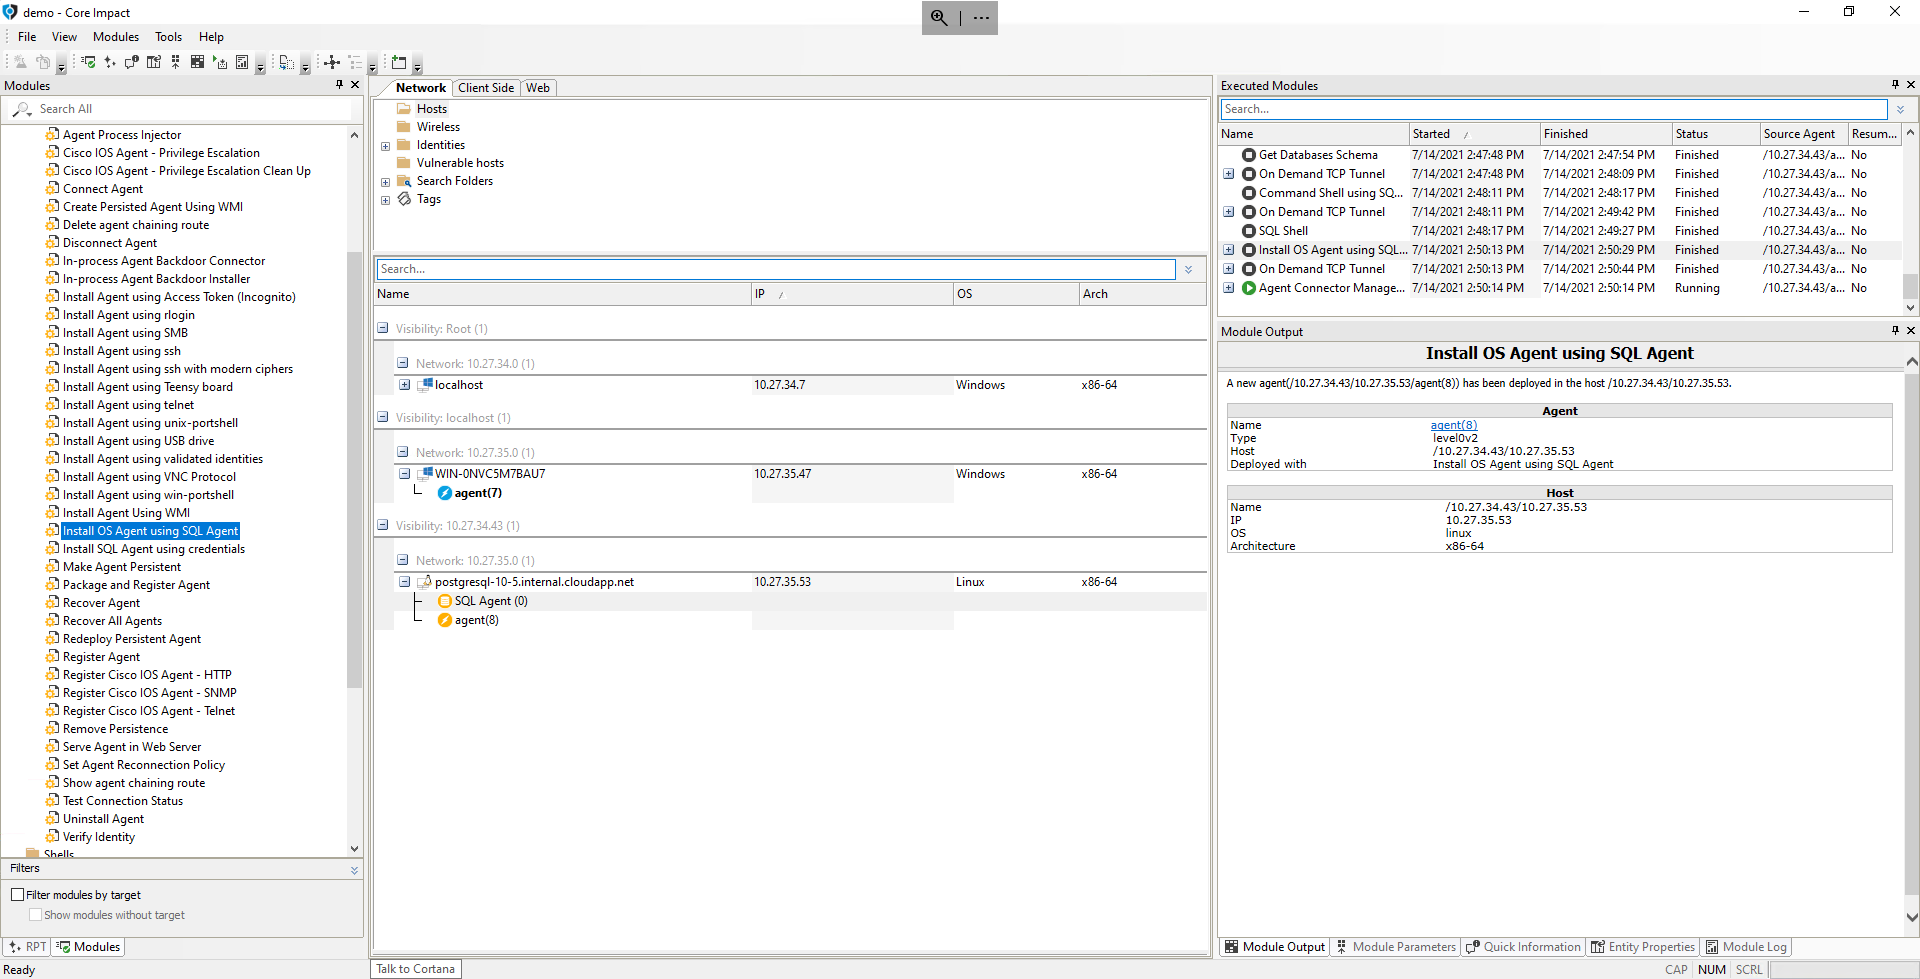
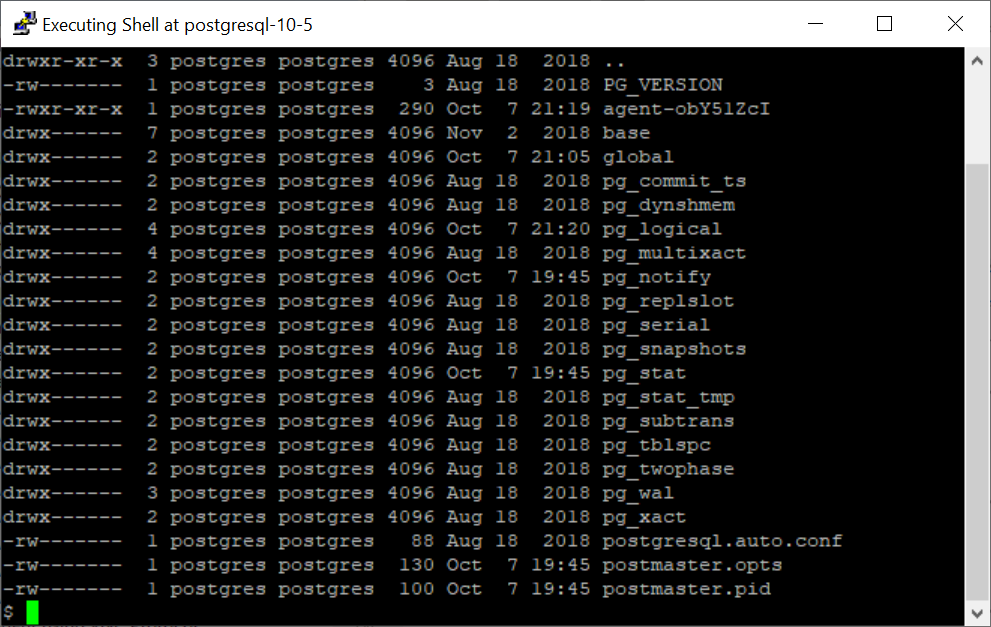
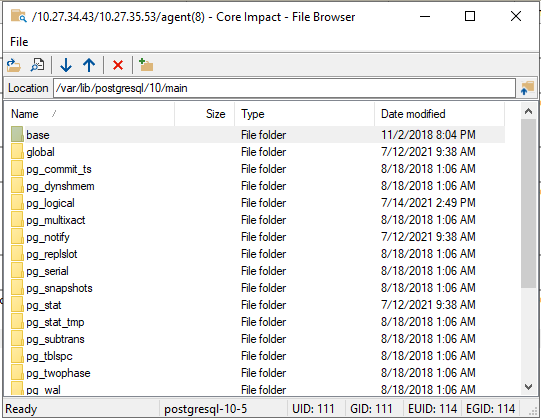
- Right-click on the new OS Agent and launch a shell or file browser to inspect the system where the database is hosted.
Perfom Clean Up of Deployed OS Agents
We'll now clean up deployed agents on compromised hosts, using the Clean Up RPT step.
This will uninstall only OS Agents, which run on the target systems. Network SQL Agents only connect to the target system whenever a module runs (in order to perform SQL statements), and when the module completes there is no longer a connection nor process running on the system.
- From the RPT Pane, select and click Network Clean Up RPT.
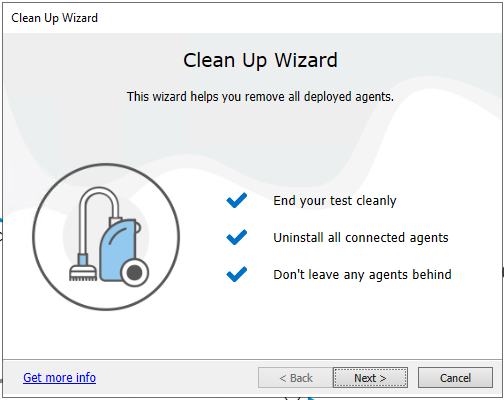
- Click Next.

- Select the option to confirm uninstallation of connected OS Agents.
- Click Finish.
When the module completes, you'll see that the OS Agents in the PostgreSQL host and that of the Windows host used to pivot to reach that host have been uninstalled.
The module determines the order of uninstallation to make sure that a pivot agent is not uninstalled before an OS Agent reached through is uninstalled.
Generate Vulnerability Report
Once again, you can generate a Vulnerability Report to document the vulnerabilities found in this pen testing session's workspace following the steps in the previous unit's section Generate report of vulnerabilities.